

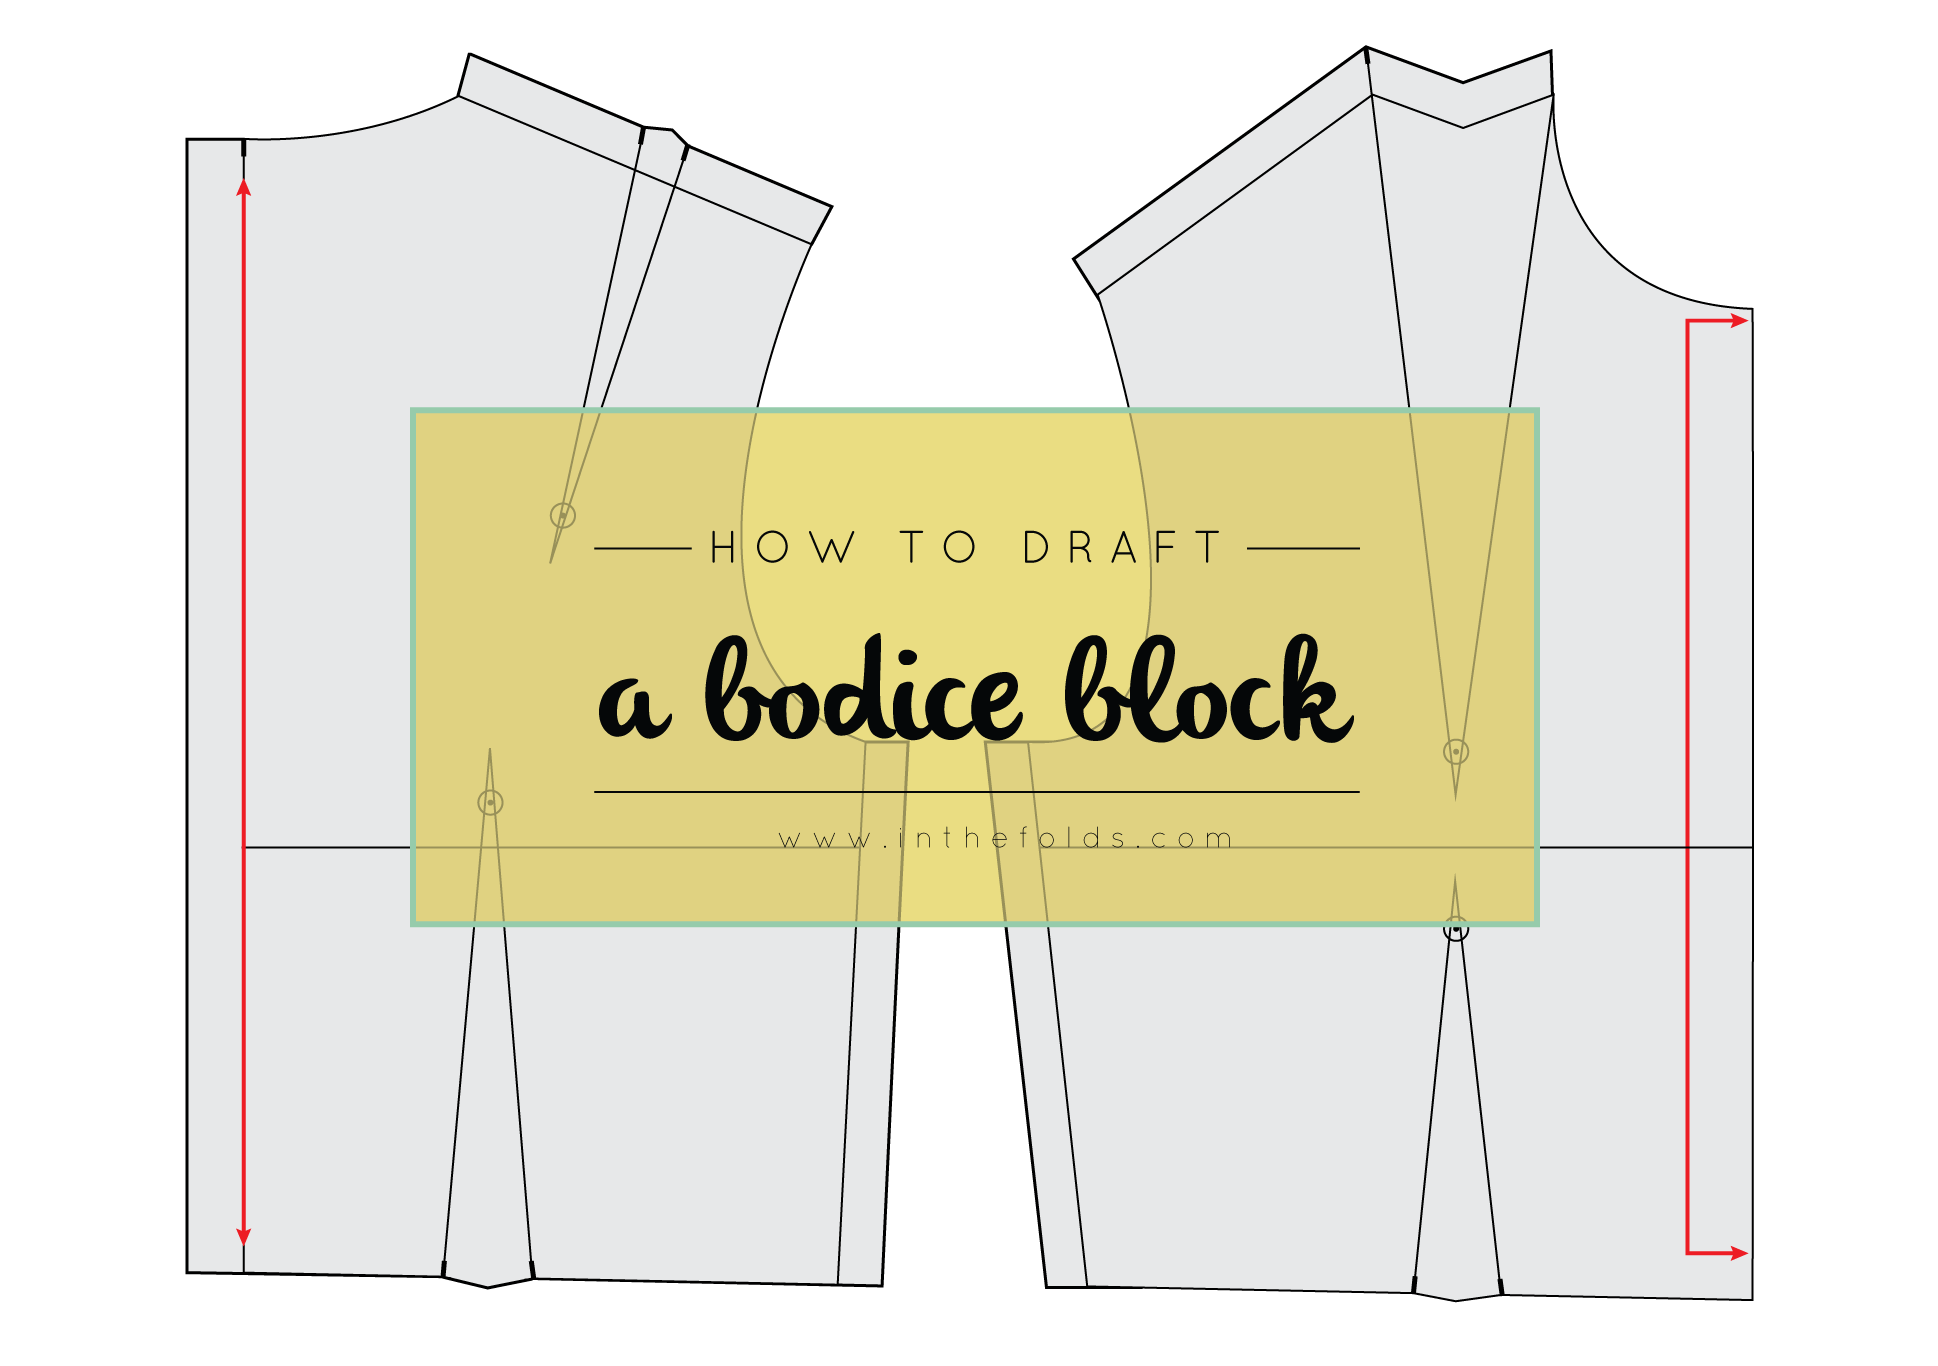
How To Make A Bodice For A Dress
After weeks and weeks (or was it months?) information technology is time to move on from the Skirt Series, and up to our upper halves! And likewise for me to go dorsum to blogging. It has been at the summit of my To-do list for weeks and weeks, but somehow I've managed to ignore it and detect other things to occupy my fourth dimension (for farther reading on why to-do lists don't work, check out this post).
So, without any more than rambling from me, it is fourth dimension to draft a bodice cake!
The bodice block
A basic bodice cake is a slap-up starting signal for most patterns involving your top half – it can be used to make tops and dresses, and paired with a sleeve cake tin exist used to make shirts, blazers, jackets and coats. Many patterns evolve from this block. So if yous are fix to outset making your own patterns, so a bodice block to your specific measurements is a great place to start (although, if you want something a trivial easier, I would suggest starting with the brim block).
This tutorial has been adapted from this corking "how to" on BurdaStyle.com, which was taken from Winifred Aldrich'south Metric Pattern Cutting for Women'southward Wear (5th ed. Blackwell Publishing: Oxford, 2008, pp 215). I changed the order in places and added more measurements, to hopefully create a better fitting bodice and an easier to follow tutorial.
So, even if you are an absolute beginner, with the right measurements, the right tools and a little patience, you lot volition accept a swell fitting bodice cake in no time!
A little note
I originally posted this tutorial a couple of years ago, on my previous weblog, Em Makes Patterns. If you saw it in that location, do not fret. This tutorial is the aforementioned. I've just updated the aesthetics of the tutorial. So there is no need to practice it all once again!
One matter I did realise though, after posting this, is that this tutorial will merely work for you if yous take a smallish bosom loving cup size. It hadn't occurred to me that this would exist an issue (every bit I am very small-scale disrepair), until a adult female contacted me to say that her bodice toile had turned out much likewise short, and nosotros worked out that it was due to her large bust size. So, if yous have a bust size any bigger than a C or D cup, I would suggest using this tutorial to draft the basic shape of your block then doing a full bust aligning to get the right cup size.
Update September 2021
Cheers so much for all the enthusiasm for this blog mail service. It has been my most pop blog post of all time! After 5 years of answering questions, I no longer take chapters to answer individual questions regarding bodice drafting. The comments have now been switched off and I will no longer be able to become dorsum to emails regarding this blog post. I'd propose reading through the comments if y'all take a question, every bit it is likely I have answered a question similar to yours over the years. You can too Run into the mail : Drafting the bodice block - Questions + Answers.
Update 2020
When I created this blog post in 2016, I had no idea that was going to become the most popular web log post on my website!
I have received a number of questions lately about the tutorial and I thought it could be a good idea to publish some of these questions and answers as an opportunity to help you on your own learning journey.
I will update the mail service as I receive more than questions, so that hopefully, if you take a question, y'all volition find a relevant respond here and tin can continue on going with your typhoon!
Come across the post : Drafting the bodice block - Questions + Answers
Measurements
The measurements yous will need for this project are:
Waist measurement

Your waist is the scrap in betwixt your rib cage and your hips. It is often the most narrow signal of your torso.
This measurement is one you will demand all the time. To find it, merely wrap the tape measure effectually your waist, ensuring that the tape measure remains level all the mode around (horizontal to the floor at both front and back).
Do non suck in your tummy like I accidentally did in this photo! Yous want to be as natural equally possible, so that your clothes fit well. Make certain the tape isn't likewise loose, or isn't pulling you in either!
You could also necktie a piece of elastic effectually your waist to become the right position and then measure.
Bust measurement

For your bosom measurement, detect the fullest signal of your breasts and take a horizontal measurement from there.
Ensure the tape measure remains horizontal every bit it wraps effectually your dorsum, for an authentic measurement (this is when measuring yourself in front of a mirror helps).
Please note: if your bust cup size is more than a C or D cup (for more than info on working out your bust cup size look hither ), you lot will likely be improve of making the typhoon as if you have a B cup bust and then doing a Full bust Adjustment.
Armscye depth

The armscye depth is the measurement I initially found the almost tricky to get my head around. For ane, I am quite sure I had never heard this term until I started reading sewing blogs (I don't think it was mentioned once in the 4 years I studied mode design), but since then, it seems to popular up all the time (always the way, right?) It too seems that there are many unlike ways people suggest to find it.
When I first drafted my bodice block, I placed three fingers under my arm and then measured down from my last finger to my waist. I don't really know what the direct correlation is between this measurement and the armscye depth, but apparently, due to the ratio of the body, these two measurements are the same.
The more obvious way of finding this distance is to measure downwardly from the nape of the cervix to the (imaginary) horizontal line that runs beyond your back, between the bottom of your armholes.
Nape of the neck to waist

This measurement is a little tricky to have on your own. Start at the nape of your neck and measure vertically downwardly to your waist.
The easiest way to do this is to toe a piece of rubberband around your waist and have someone measure out downwardly from the nape of your neck to the rubberband on your waist.
Nape of the neck to Bust line

Again, the easiest fashion to have this measurement volition be to tie a slice of elastic around your bosom and have someone measure down from the nape of your neck to the rubberband.
Neck circumference

To take your neck measurement, wrap the tape measure effectually the base of operations of your neck, making sure information technology is not likewise tight.
Shoulder length
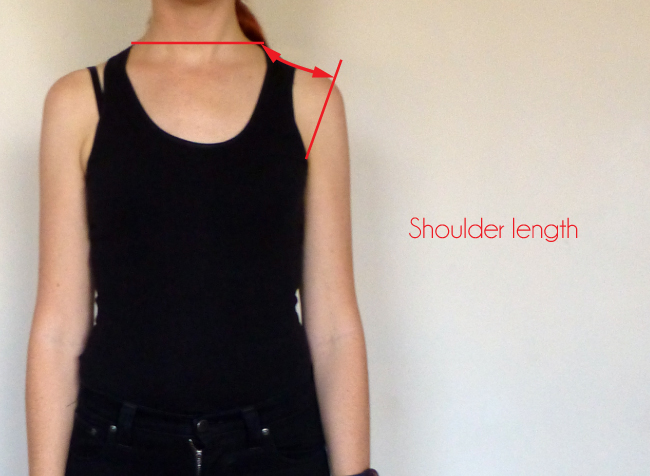
To measure the length of your shoulder, first observe the peak of your shoulder (this is the bony bit before your shoulder becomes your upper arm). Now measure between the base of operations of your cervix and the height of your shoulder.
Back width
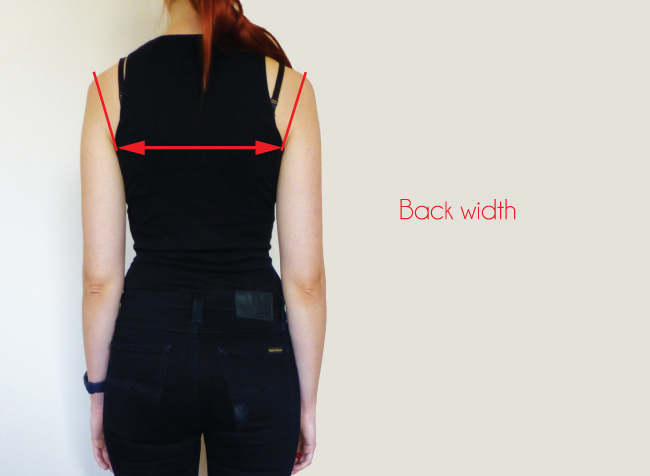
Your back width is the horizontal measurement of your back, from the lesser of a standard armhole, across to the other armhole.
Shoulder to bust measurement

For the shoulder to bosom measurement, hold the tape mensurate in the middle of your shoulder (approximately where your bra strap sits) and mensurate down to bust point, following the bend of your breast.
Bust point to betoken
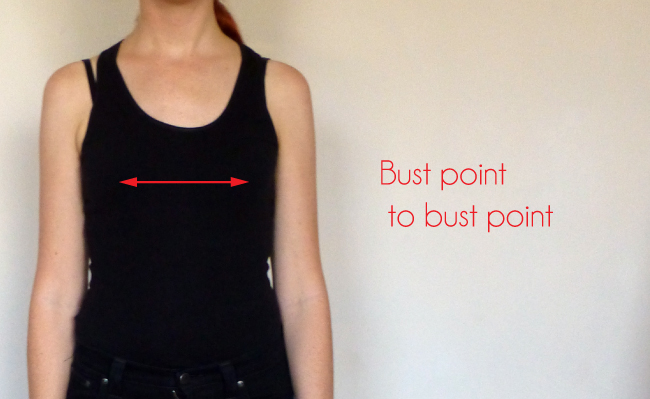
Knowing the distance between bust points (I similar to call this measurement "the nip to nip") tin assist when adding bust darts or drawing panels that you would like to cut through the bosom (princess panels, for example).
Simply have the horizontal distance between your breasts.
Tools
You will need a large sheet of paper (approximately 1m x 0.5m), a sharp pencil or pacer, a long ruler, and french curve or Patternmaster (or a plate if you lot don't accept a french curve). An eraser volition also come in handy!
Okay... Permit's become!
Drafting the cake
CONSTRUCT THE CENTRE BACK

With a large piece of pattern newspaper marker a point A close to the pinnacle left corner (e'er leave some space around the starting bespeak when drafting patterns). From this point, depict a vertical line down the left hand side of the newspaper that is the length of the nape of cervix to waist measurement. Marking the stop point as B. This line will go the CENTRE BACK seam of the cake and the grainline of your back design piece.

Extend line AB past one.5cm (1/2") from A, and label new endpoint as C. This extra 1.5cm (1/2") allows for back neck shaping. Label AB as CENTRE Dorsum (CB).
CONSTRUCT the bustline
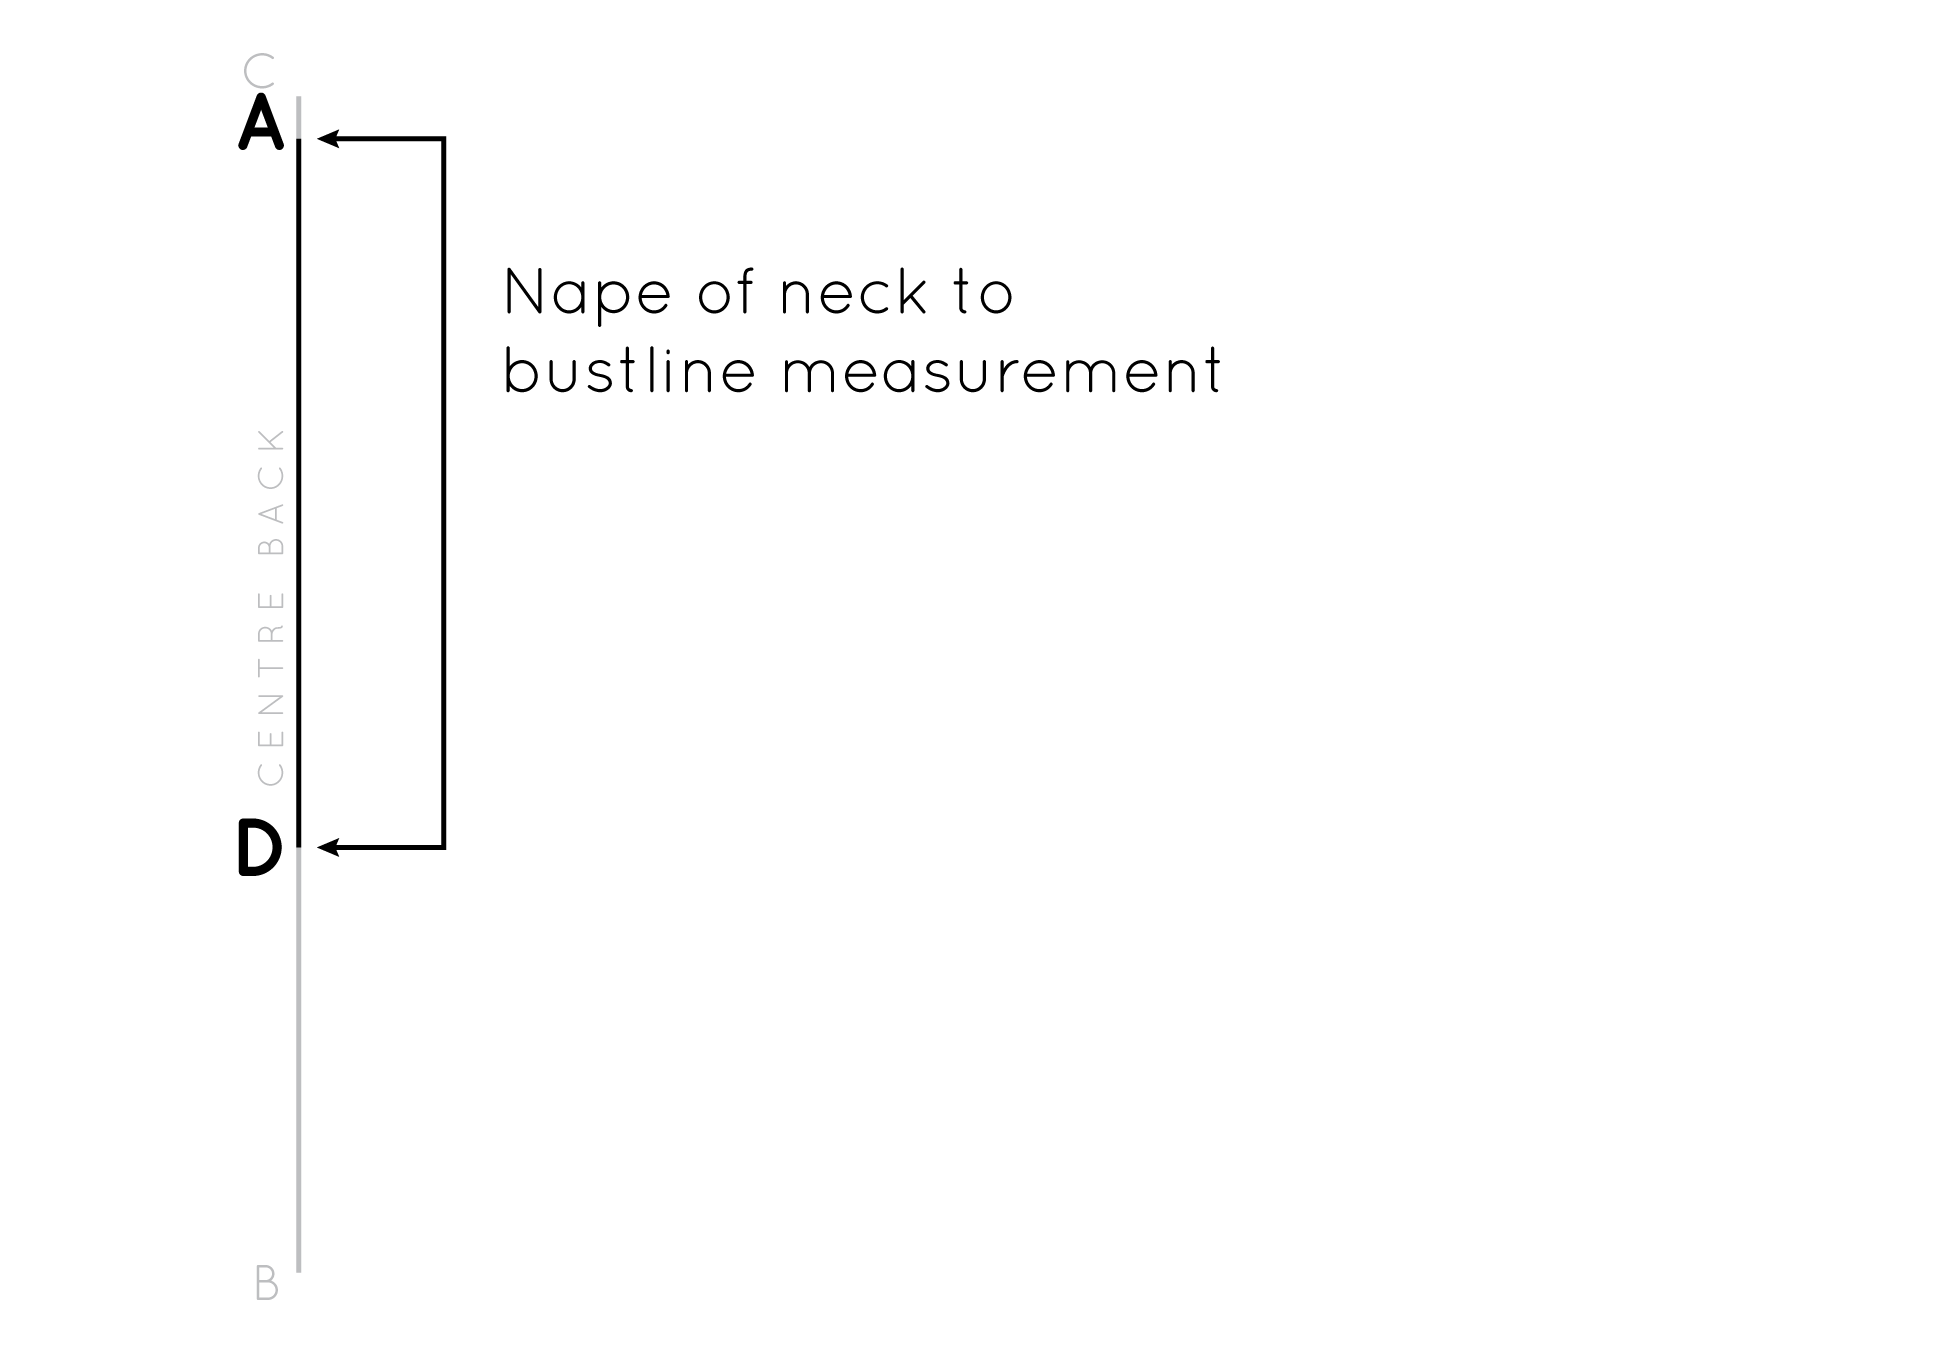
Next, we will indicate our BUST LINE (the horizontal line that runs through both the front end and dorsum of the blueprint at bosom level). Take the nape of neck to bustline measurement. And so, measuring from point A, mark this length as point D on line AB.

Square out from signal D with a line that is half of your bust measurement (just half bosom is required as nosotros are making the design on the half – i.east. the front will exist cutting on the fold, and a pair of the back volition exist cut) plus ease. For the example I decided to add 5cm (2") ease to the bust. Remember to halve the corporeality of ease, earlier adding it to your one-half bust measurement,

Label end point of this line every bit E. Marker this line equally BUST LINE.
CONSTRUCT THE WASITLINE
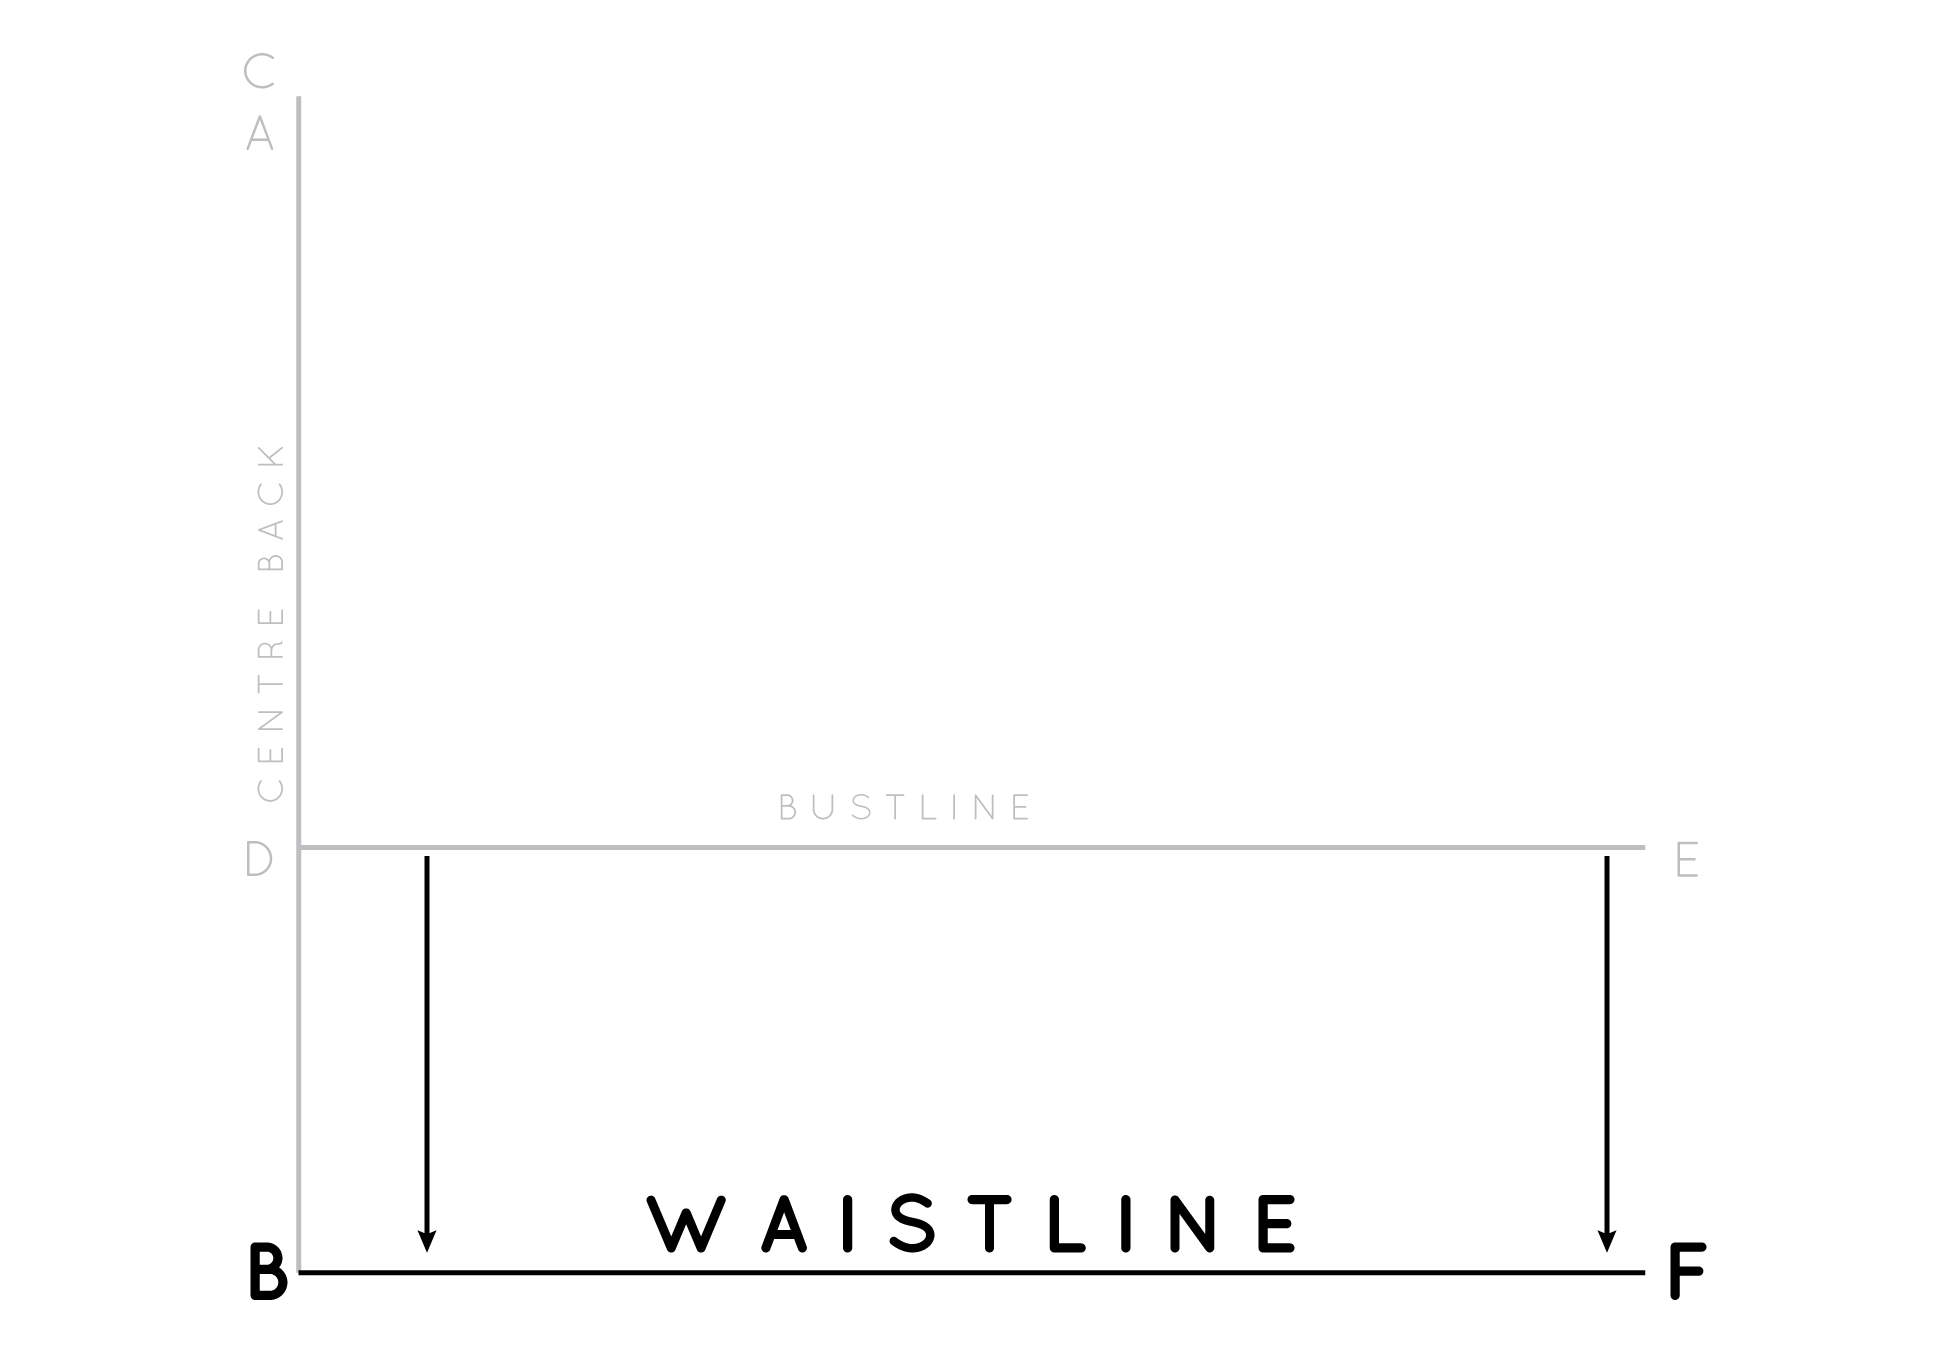
Square out from point B, drawing a line the same length as your bosom line. Marker endpoint as F. Label this line WAIST LINE.
CONSTRUCT THE Eye Front
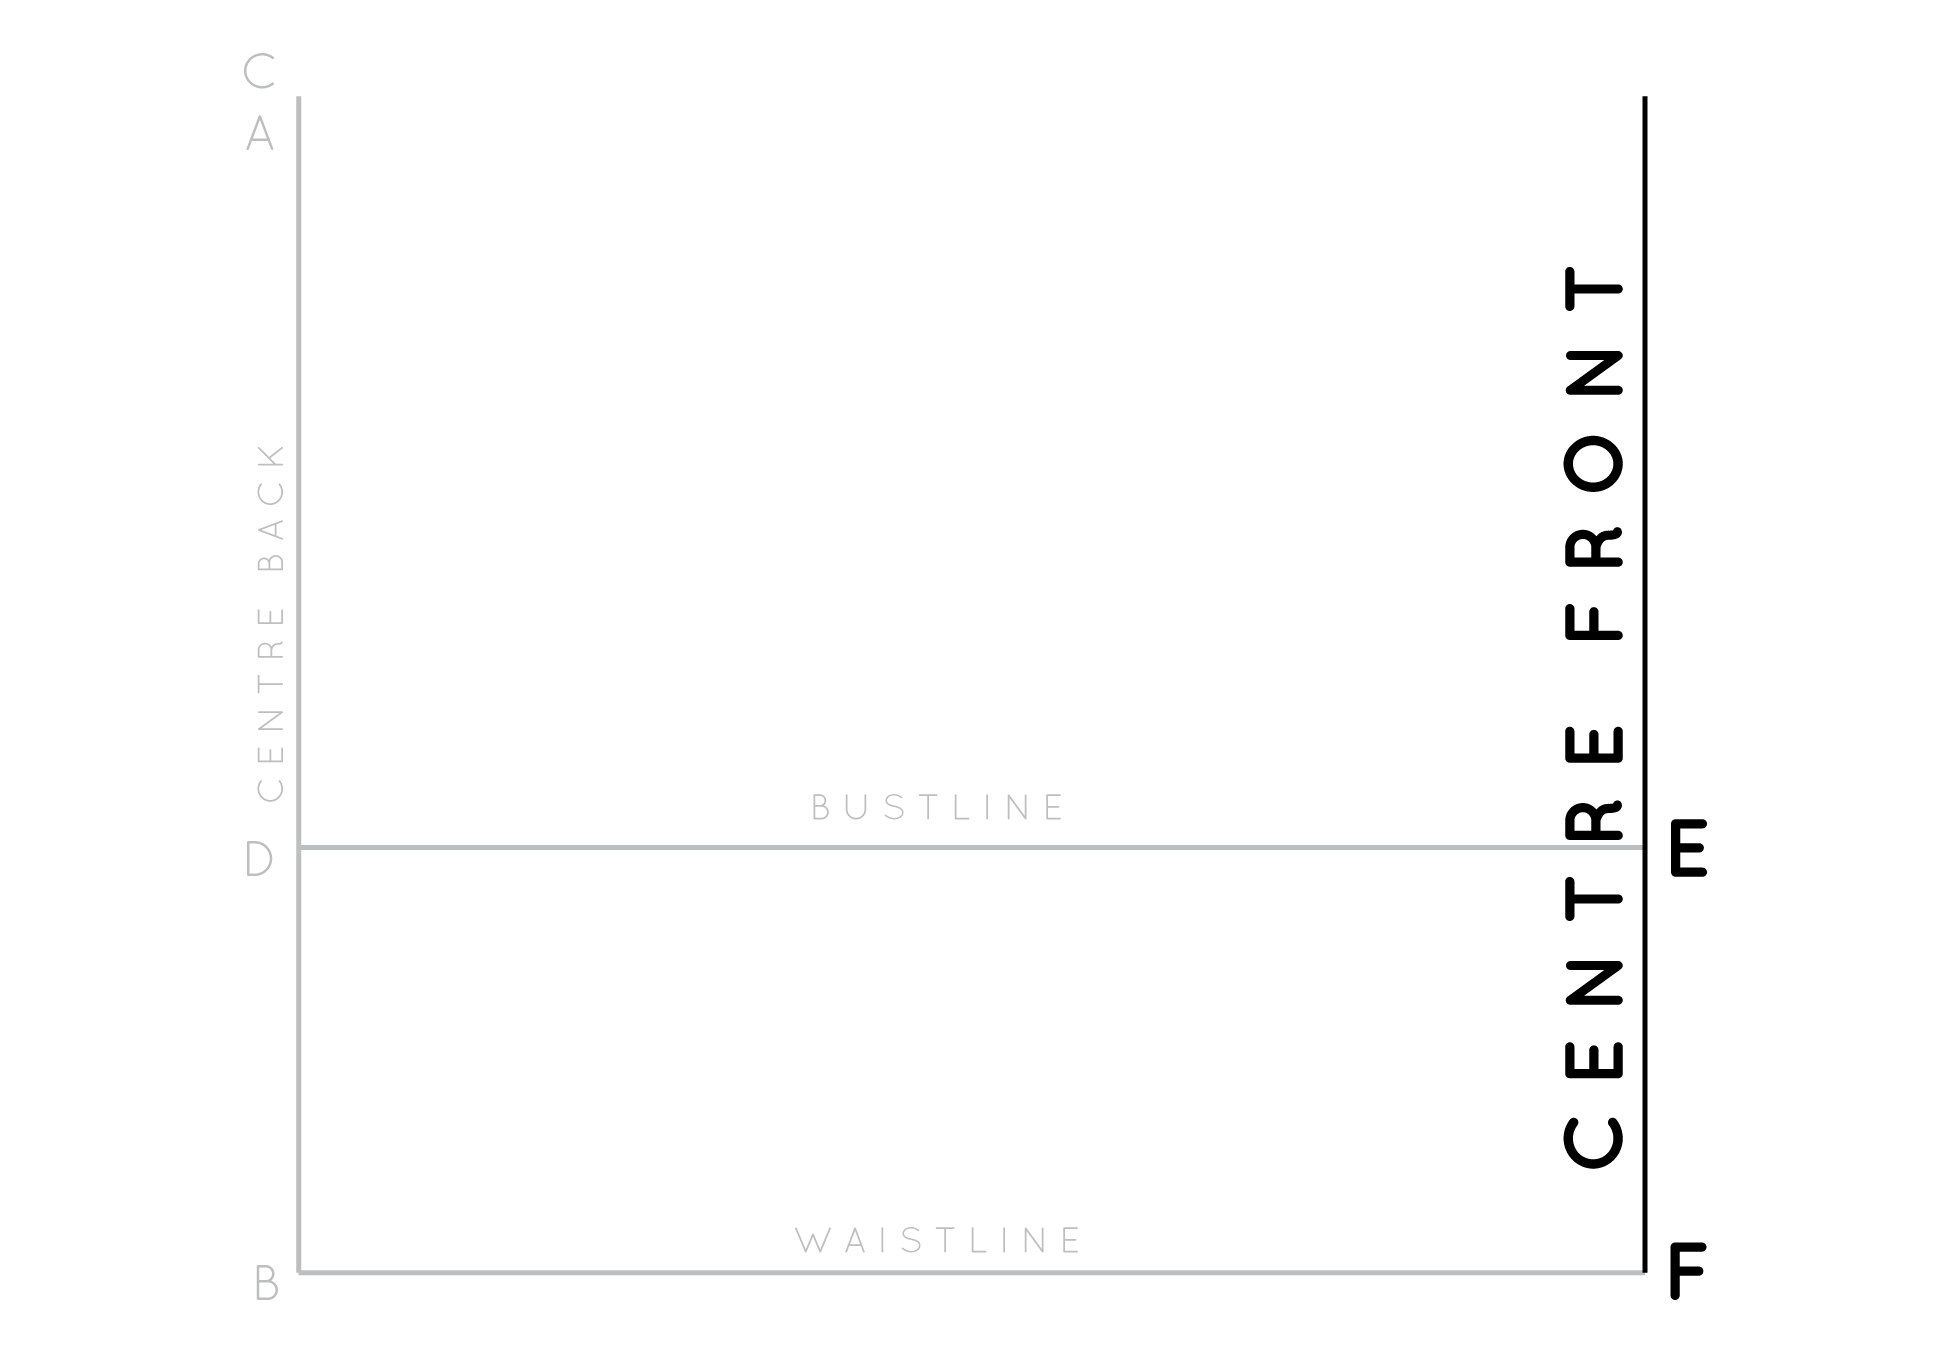
Square up from F (passing through E), the length of the Heart Back (including the extension), and mark the end stop point as G. Label FG as the Center FRONT (CF). This will also be the grainline of your front pattern piece.

Join G to C with a straight line.
Marker the armscye

Take the armscye depth measurement and add together 0.5cm (one/4"). Measuring from point A down towards point B, marking this distance on Eye BACK. Label this betoken equally H.
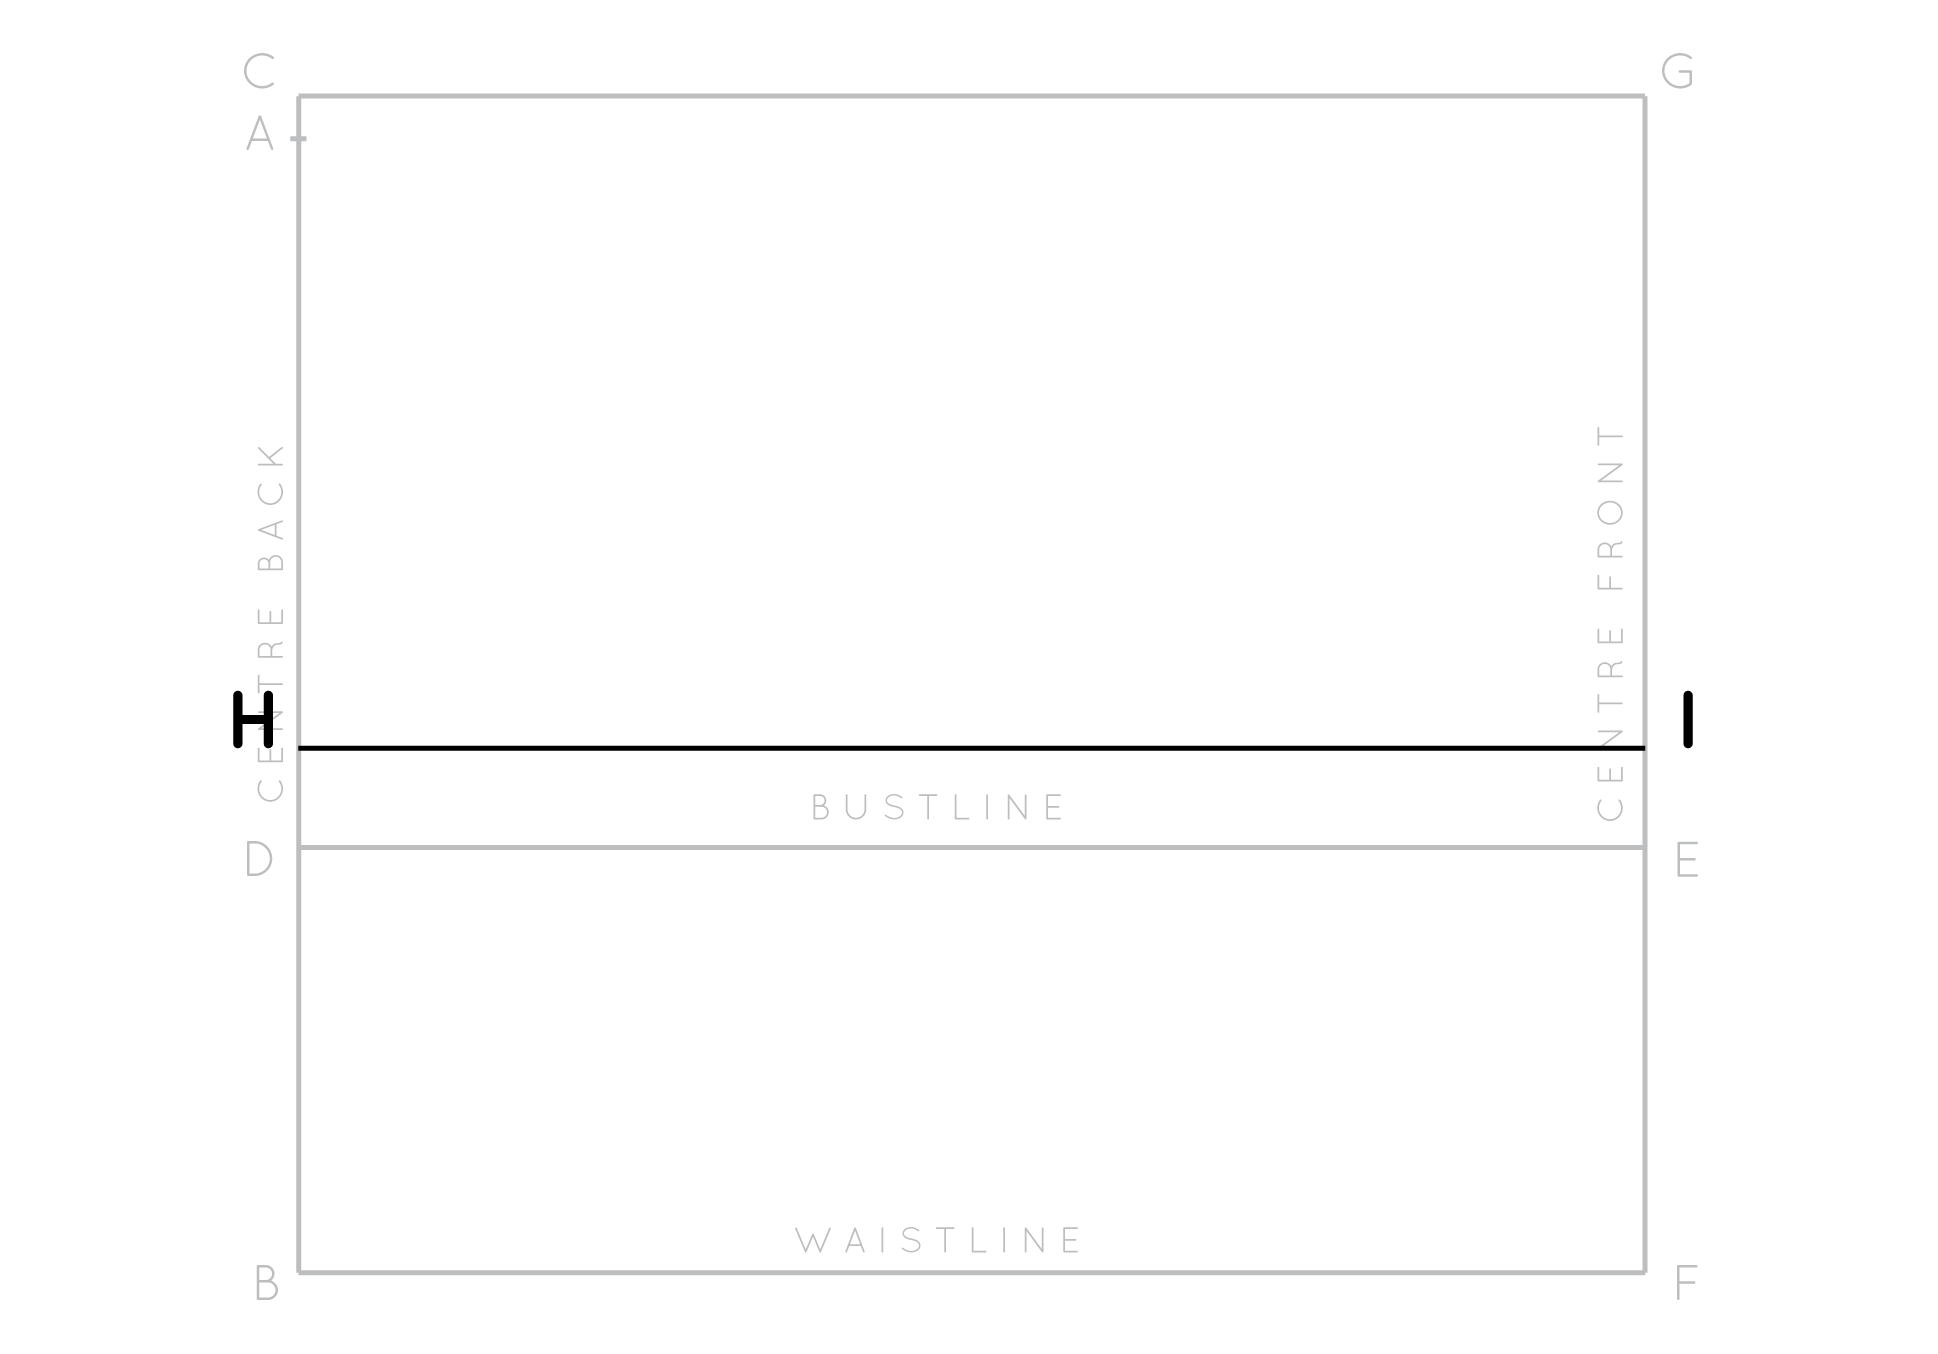
Foursquare out from H and extend the line until it intersects the CENTRE FRONT line. Marking the intersection indicate equally I.
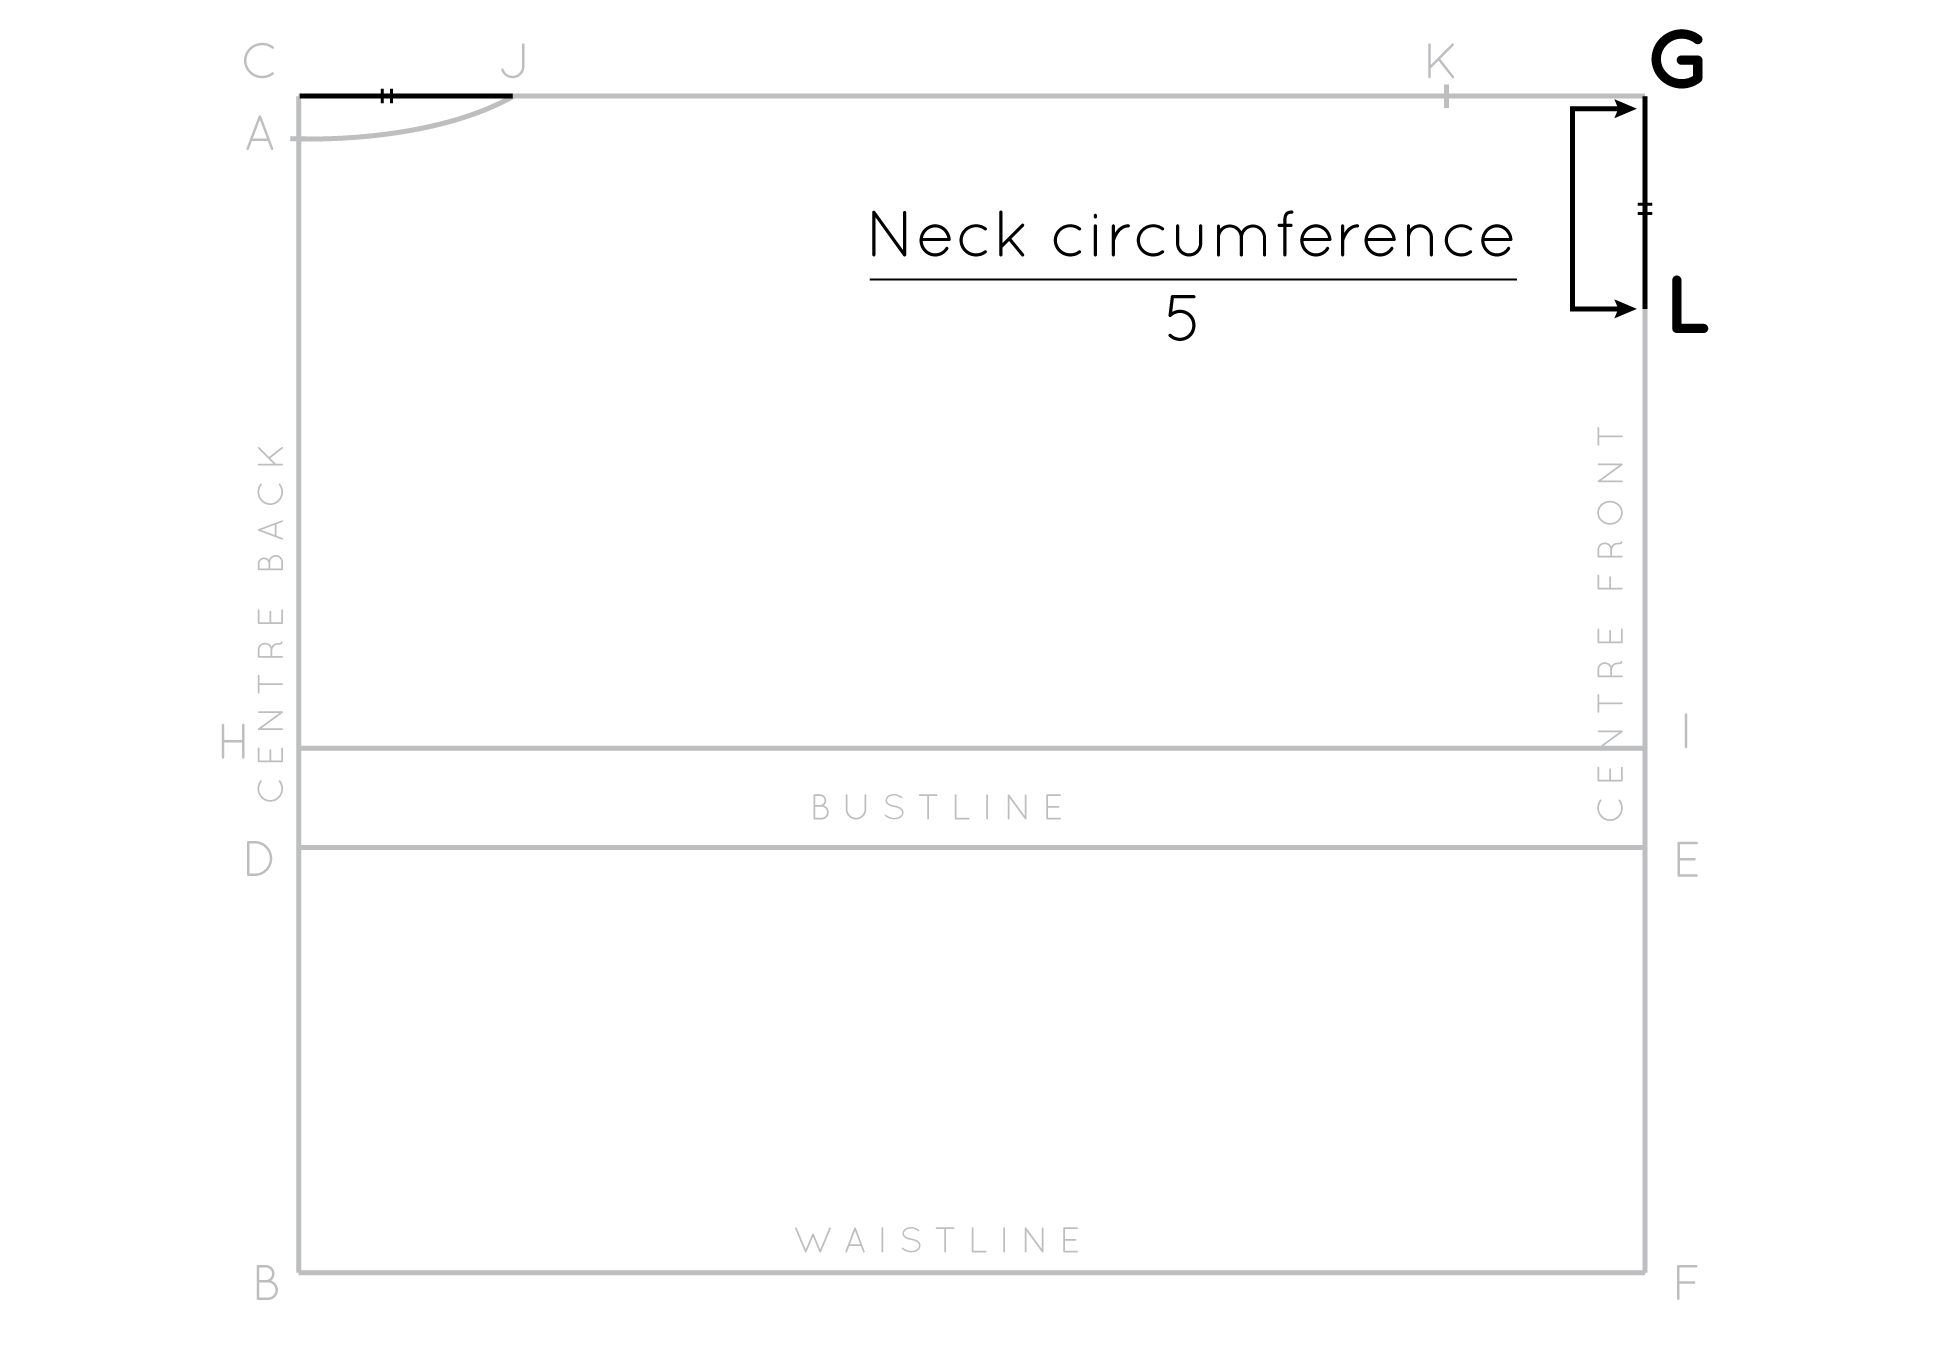
Construct the back neckline

Take your neck measurement and split it by 5. Measuring from betoken C, mark this measurement on line CJ. Label this point as point J.

Join points A and J with a shallow curve – this curve is the back neckline.
*Tip

When working with curved lines, ever check that they come to a correct angle when they come across a straight seam (for example, the centre front, centre back or side seam). By doing this, you ensure that you lot will get a overnice smooth bend when you cut a pair of a particular piece, or cut it on the fold.
Construct the front end neckline

Take your neck measurement, split it past 5 so subtract 0.5cm (ane/4"). Mark this measurement on line GC (measuring from signal G) as point Thousand.
On the Eye FRONT (GF) marking a point the same length equally CJ down from point Thousand (neck circumference divided by 5). Mark the point equally Fifty.
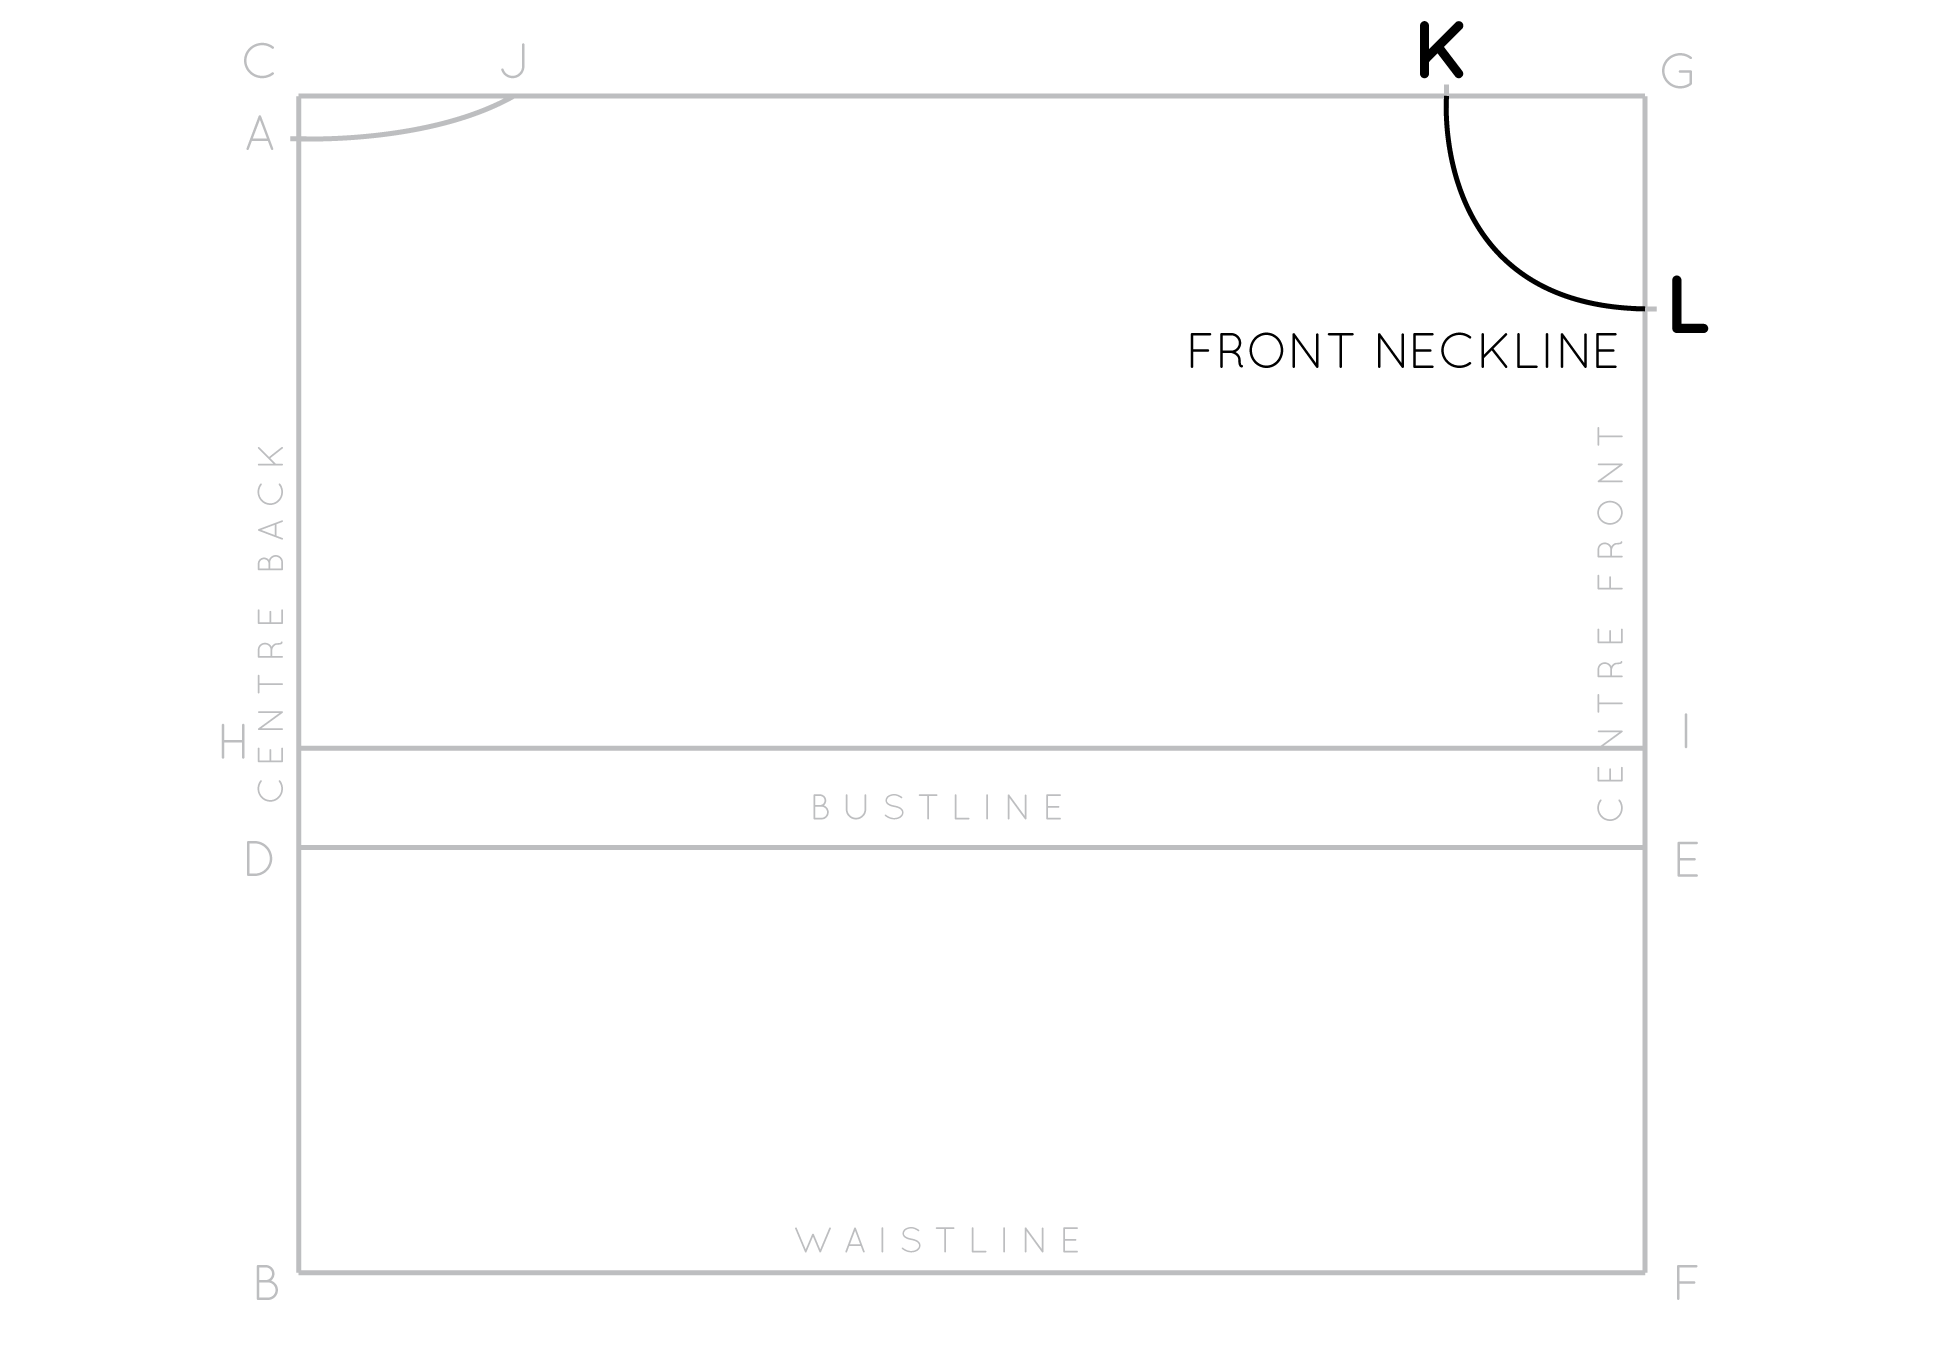
Join Thousand to L with a deep bend – this is the front neckline. Every bit we did with the back neckline, cheque that the curve of the neckline meets the centre forepart at a right angle (and then that y'all will get a squeamish smooth neckline when yous cut the slice on the fold).
Drafting the BACK SHOULDER SEAM

Take your armscye depth measurement and dissever it past 5 and and then subtract 0.5cm (1/4"). Marker this altitude, measuring down from A on the Middle Back as indicate North.

Square out from signal N. This is just a guideline, so does not have to be a specific length.
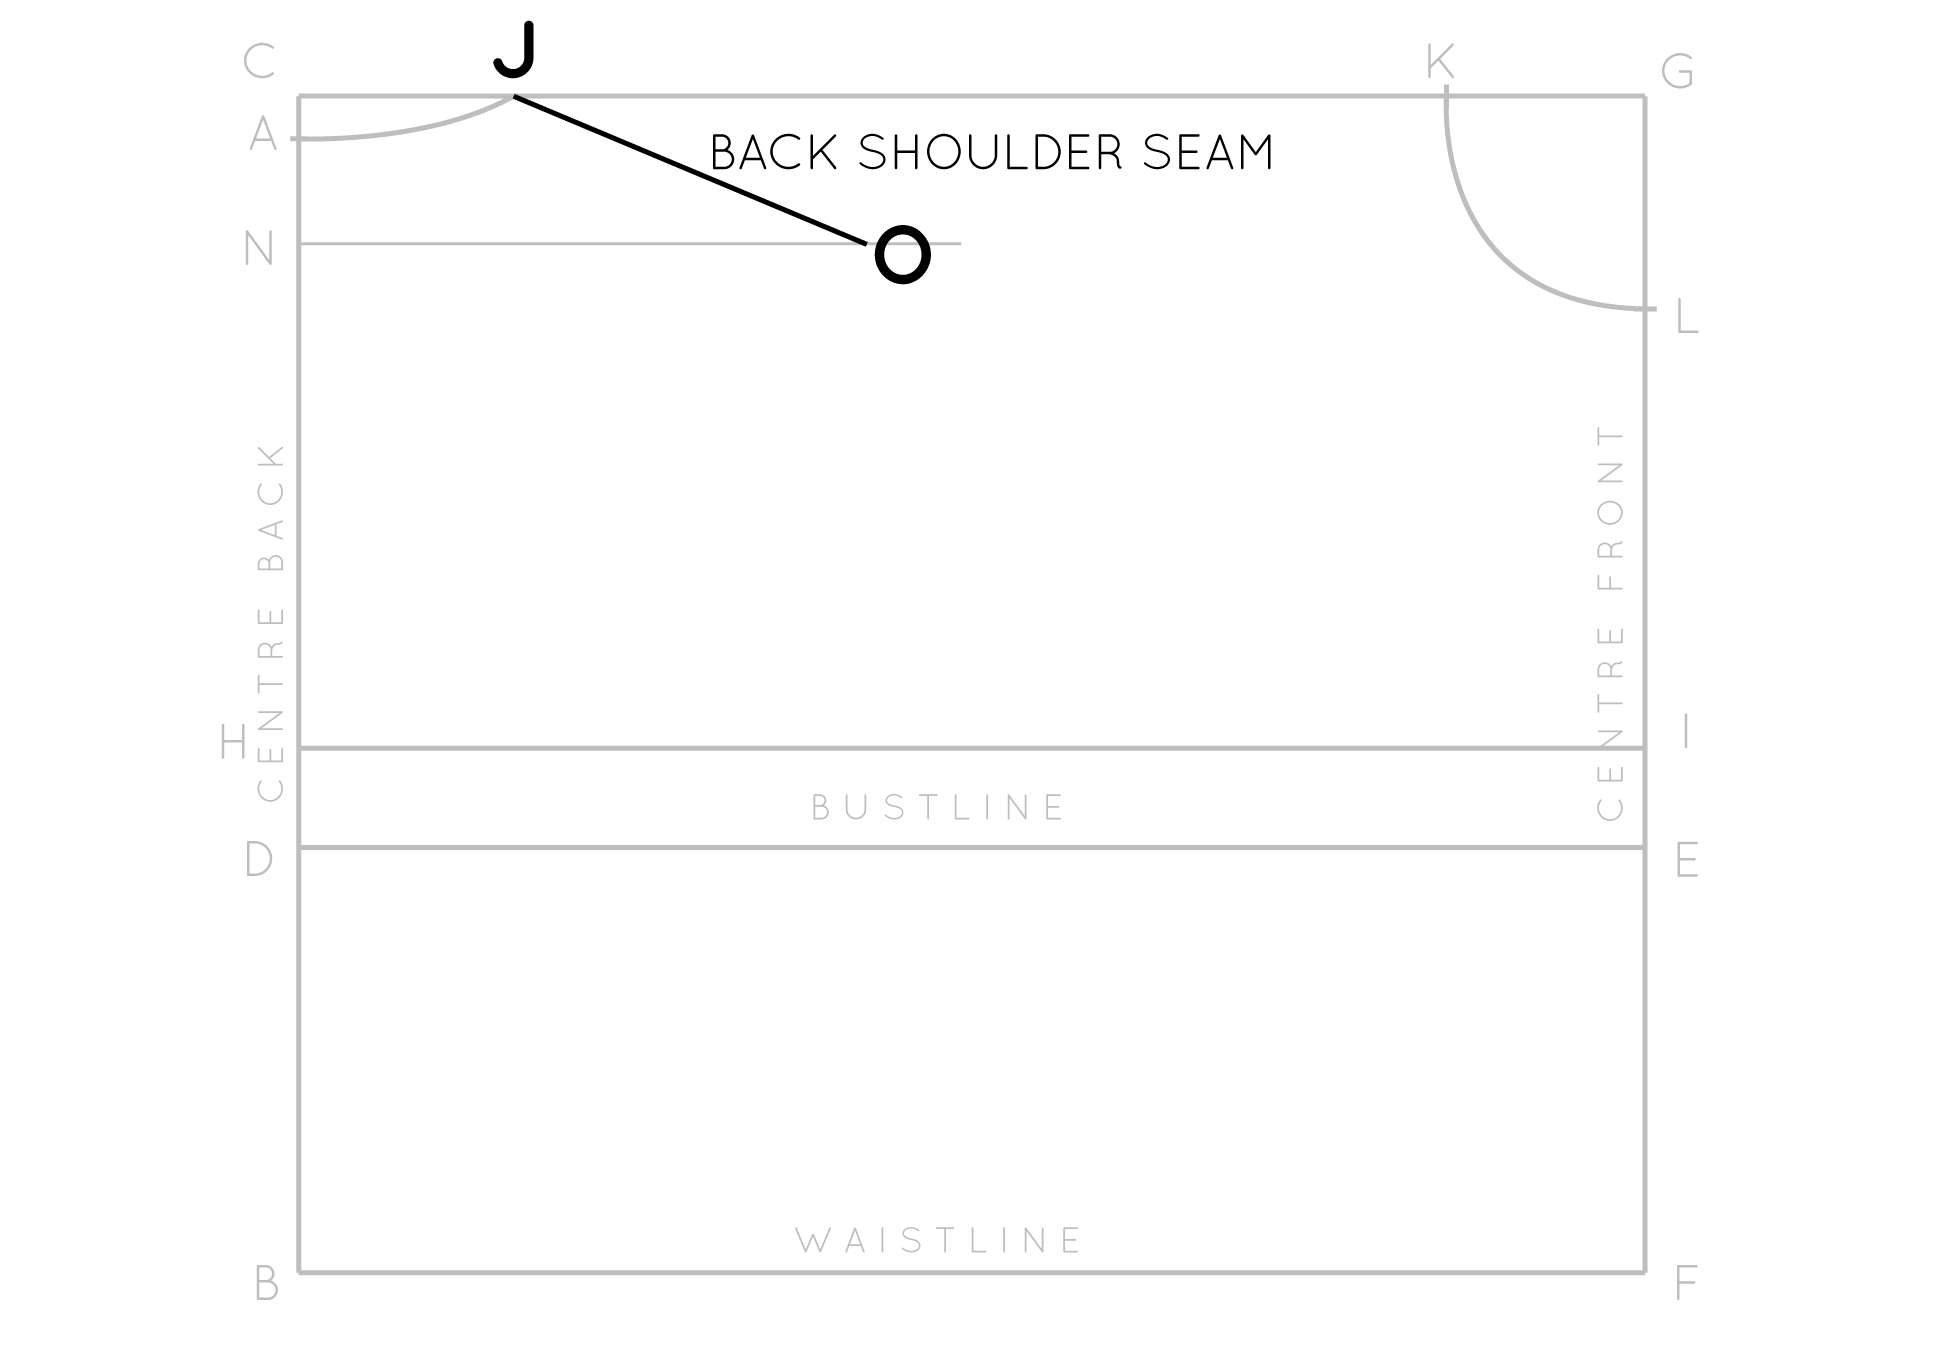
Accept your shoulder length measurement and add 1.5cm (1/two") (this is the allowance for the shoulder dart). With this length in listen (or written down if you have a bad retention like me), utilize a ruler to pivot from bespeak J until your measurement passes through the perpendicular line fatigued from Due north. Draw a directly line to create your shoulder line. Label the endpoint as O.
Drafting the back shoulder dart

Mark the midpoint of the back shoulder seam (line JO) (i.east. the distance halfway between J and O) every bit bespeak P.

Mark a point 15cm (6") downwards from indicate A, on the Centre BACK line, and square out from this point. Once again, this is only a guideline, so does non demand to be a specific length.

From point P, describe a guideline parallel to Heart BACK, extending down until information technology passes through the perpendicular line that you lot marked in the previous step.
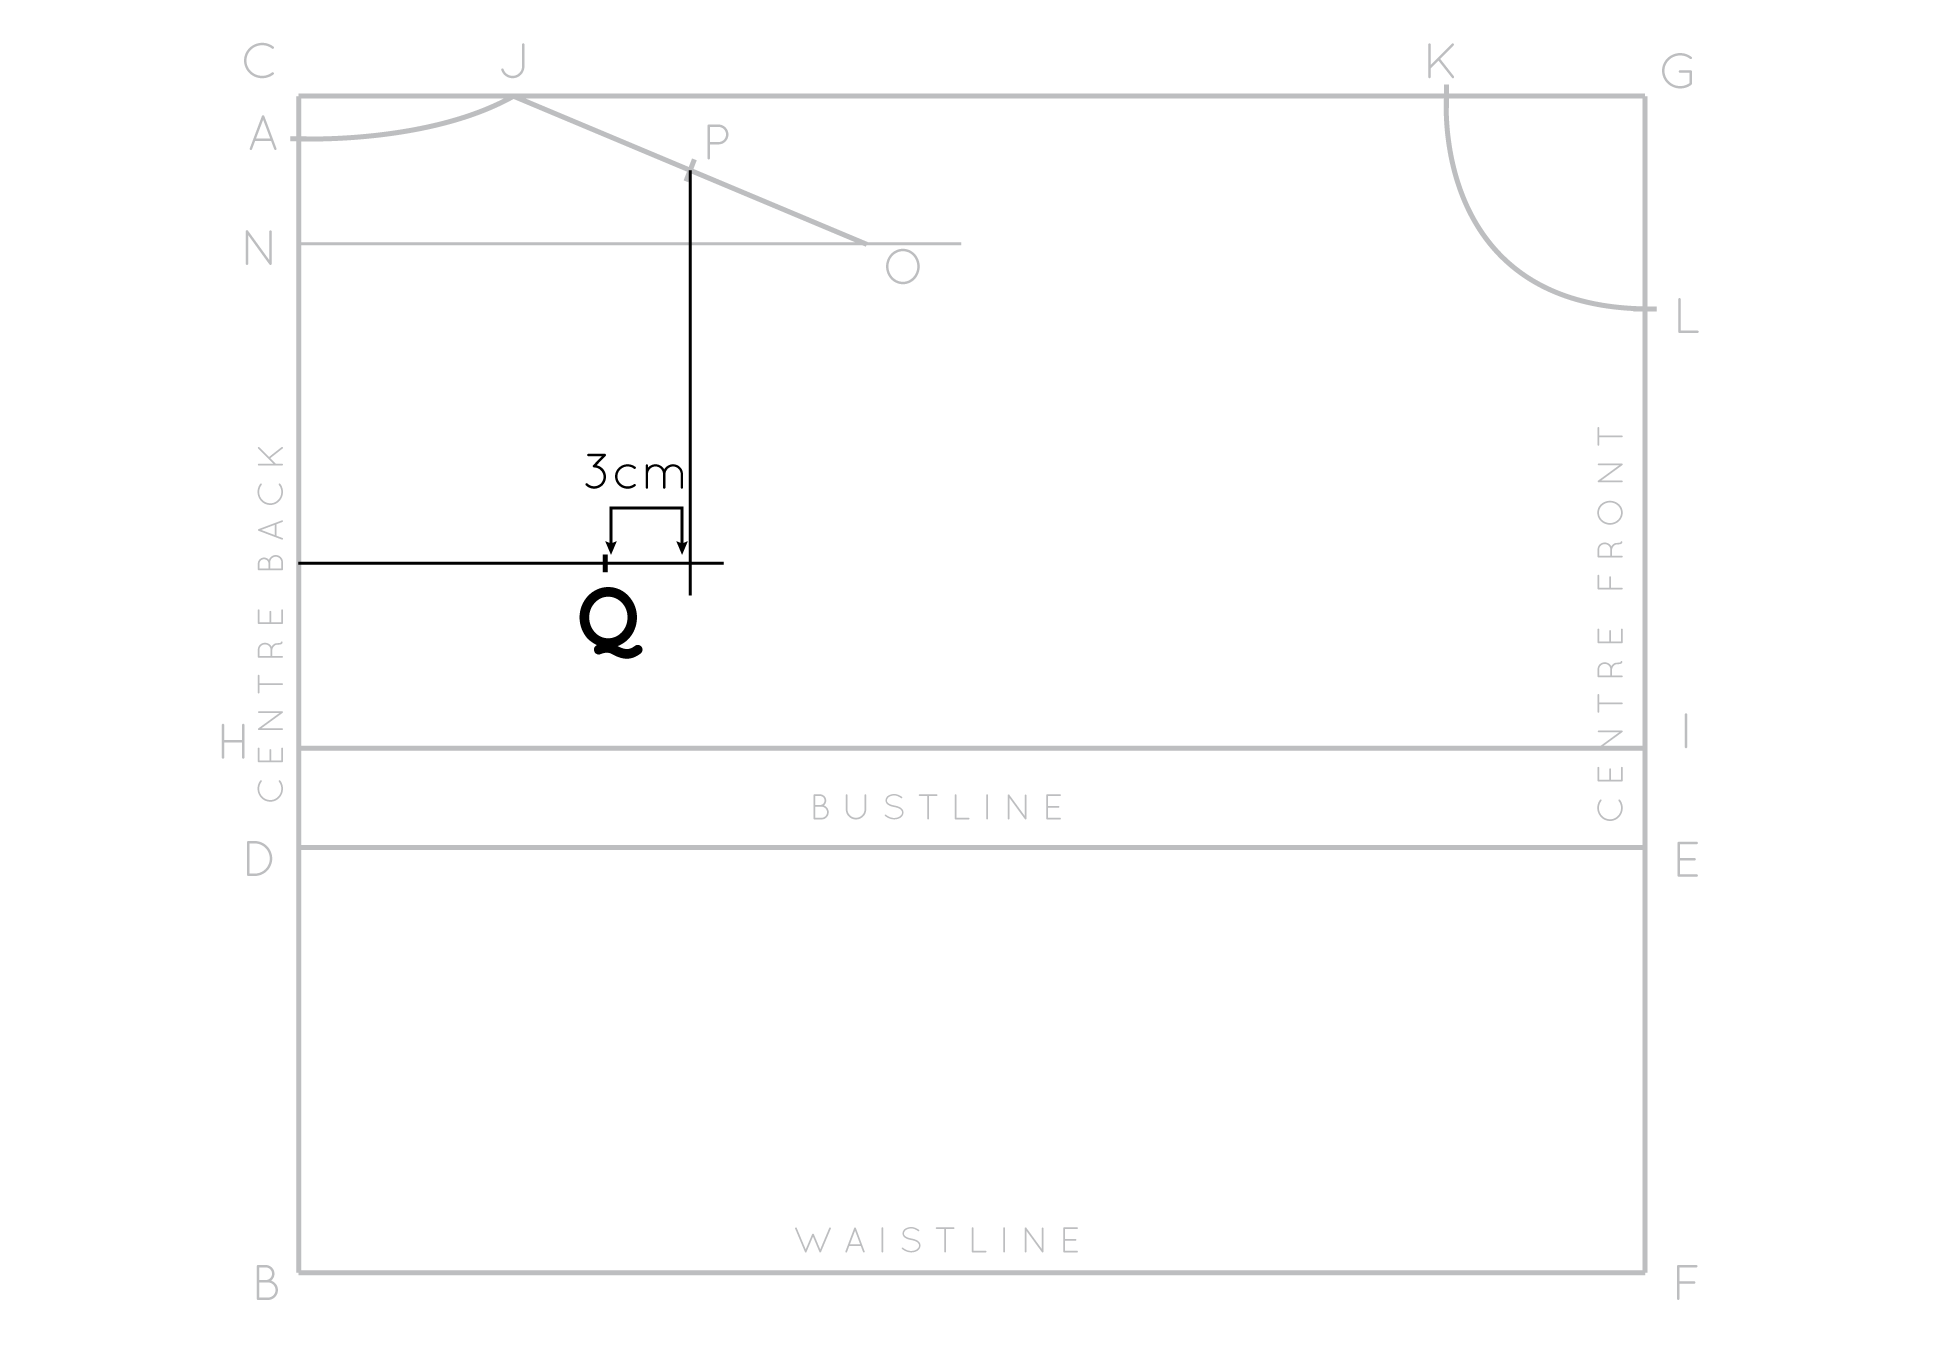
From where these lines intersect, mark a point 3cm (1 one/4") towards the Centre Back and label equally signal Q. Q will become the signal of the back shoulder dart.

Marker a point i.5cm (one/2") from P on the back shoulder seam (line JO), towards O. Characterization this point as bespeak R.

Join P to Q to create the first sprint arm, and point R to Q to create the 2d sprint arm.
Download The Little Book of Seam Finishes

Would you lot like to brand dress that are as beautiful on the inside as they are on the outside?
Sign-up to the newsletter to stay in the loop to receive inspiring content that will help you become a more confident maker. And get started with a gratis e-volume!
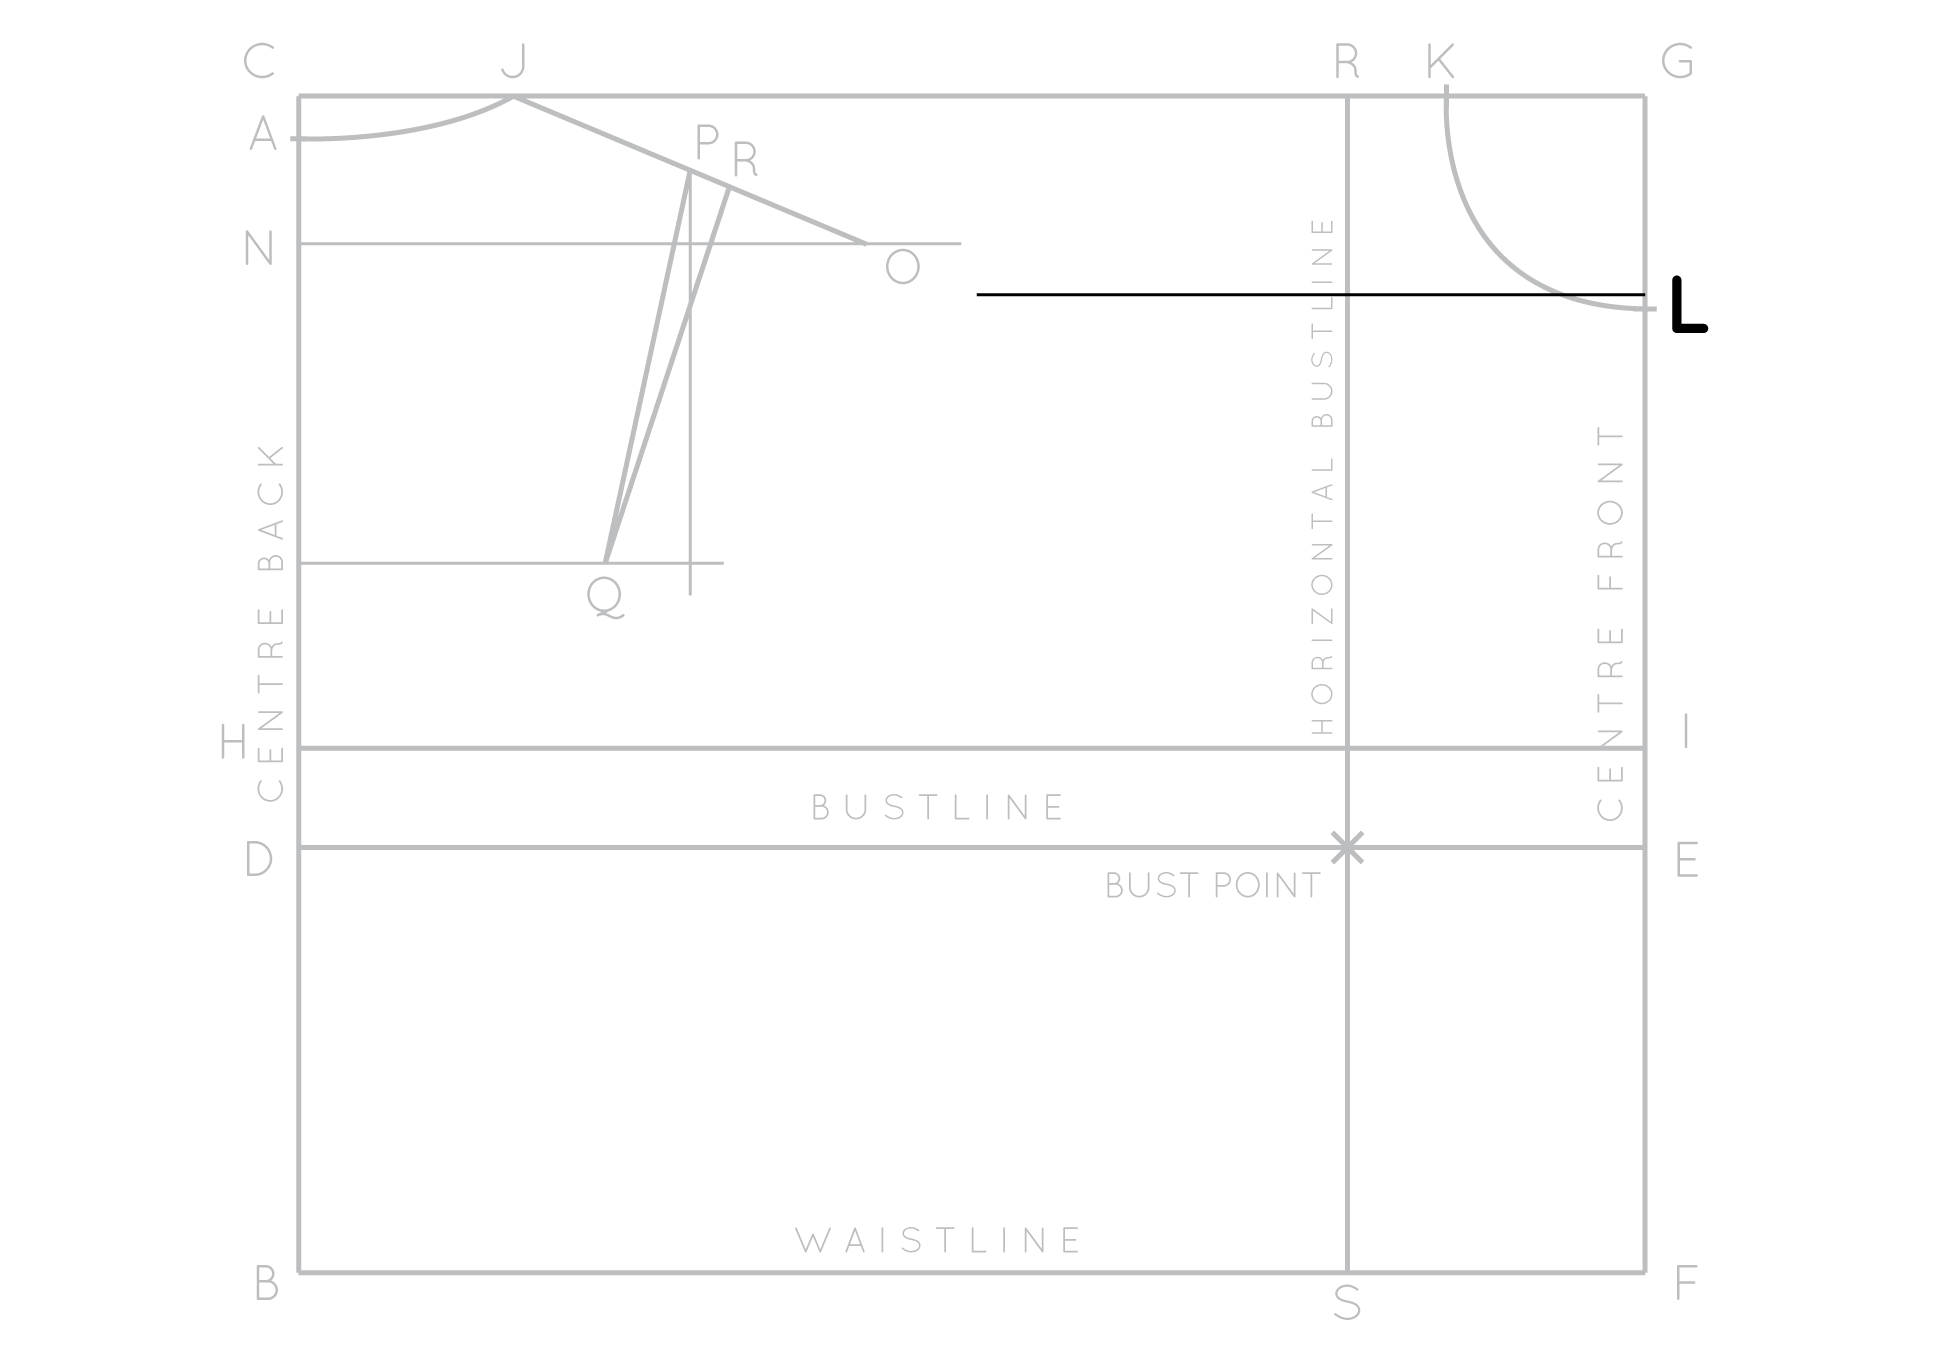
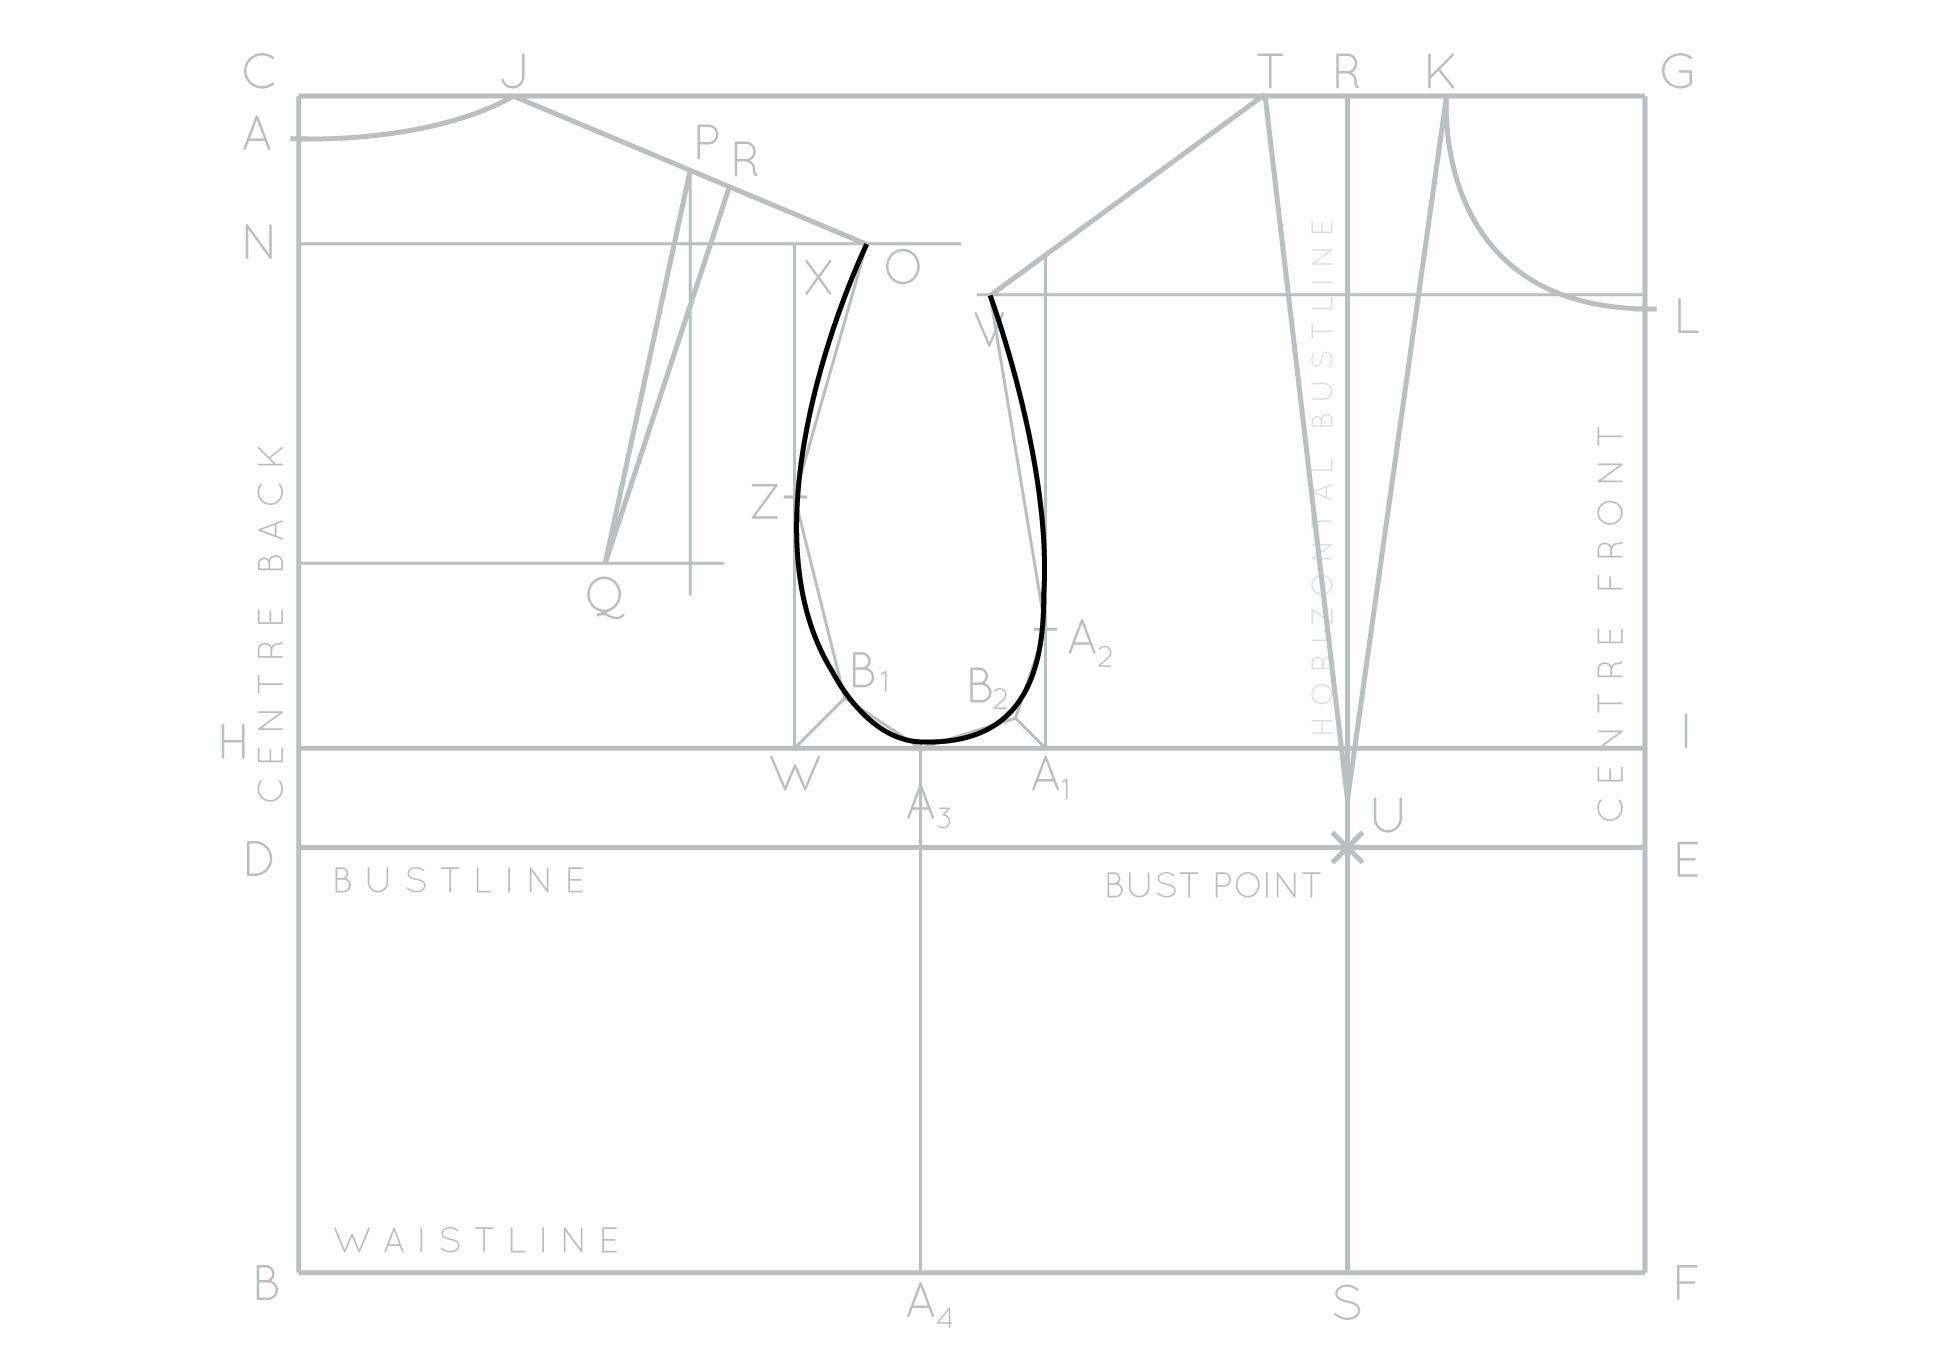
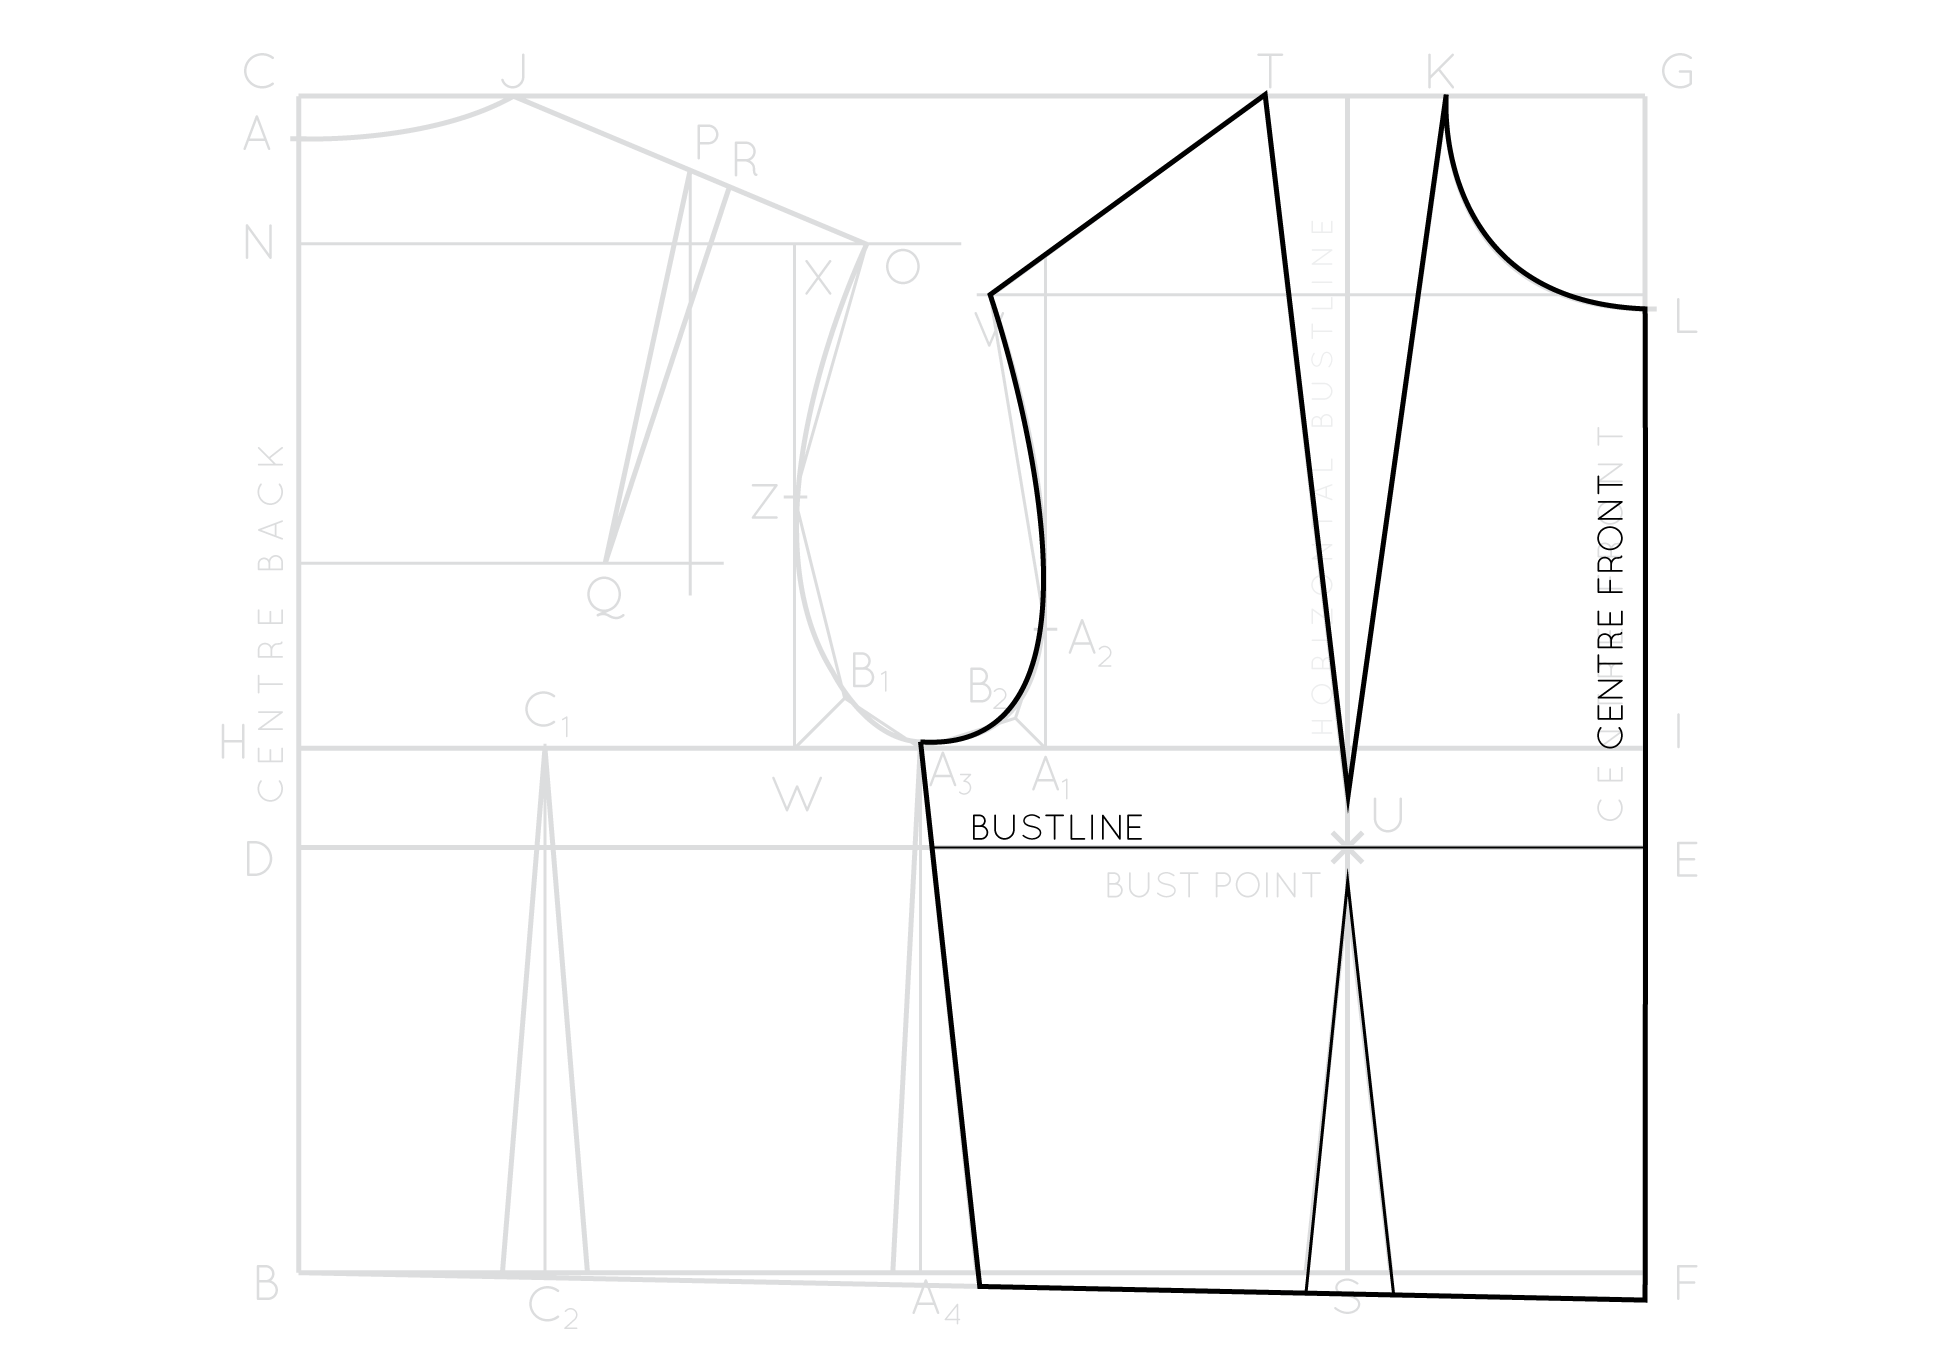
Marker the bosom betoken

Move your attention to you BUST LINE (line ED). Have your bust point to signal measurement and divide it by ii (as we are working on the half) and add 0.5cm (1/4") (allocated ease). Have note of this measurement. From bespeak East, on the bustline, mark a signal, the distance you just found from point Eastward. Mark this signal as your BUST Bespeak.

Draw a vertical line, parallel to the center front and heart back, passing through the bust point, intersecting all your horizontal guidelines. This line is the VERTICAL Bust LINE. Where it intersects CG label as indicate R and point S where it intersects the WAISTLINE (BF).
Draft the front shoulder dart
Mark a point 0.5cm (1/4") up from 50 on the Middle FRONT (line GF) and square out from this bespeak. Again, this is but a guideline, so it doesn't take to be a specific length.
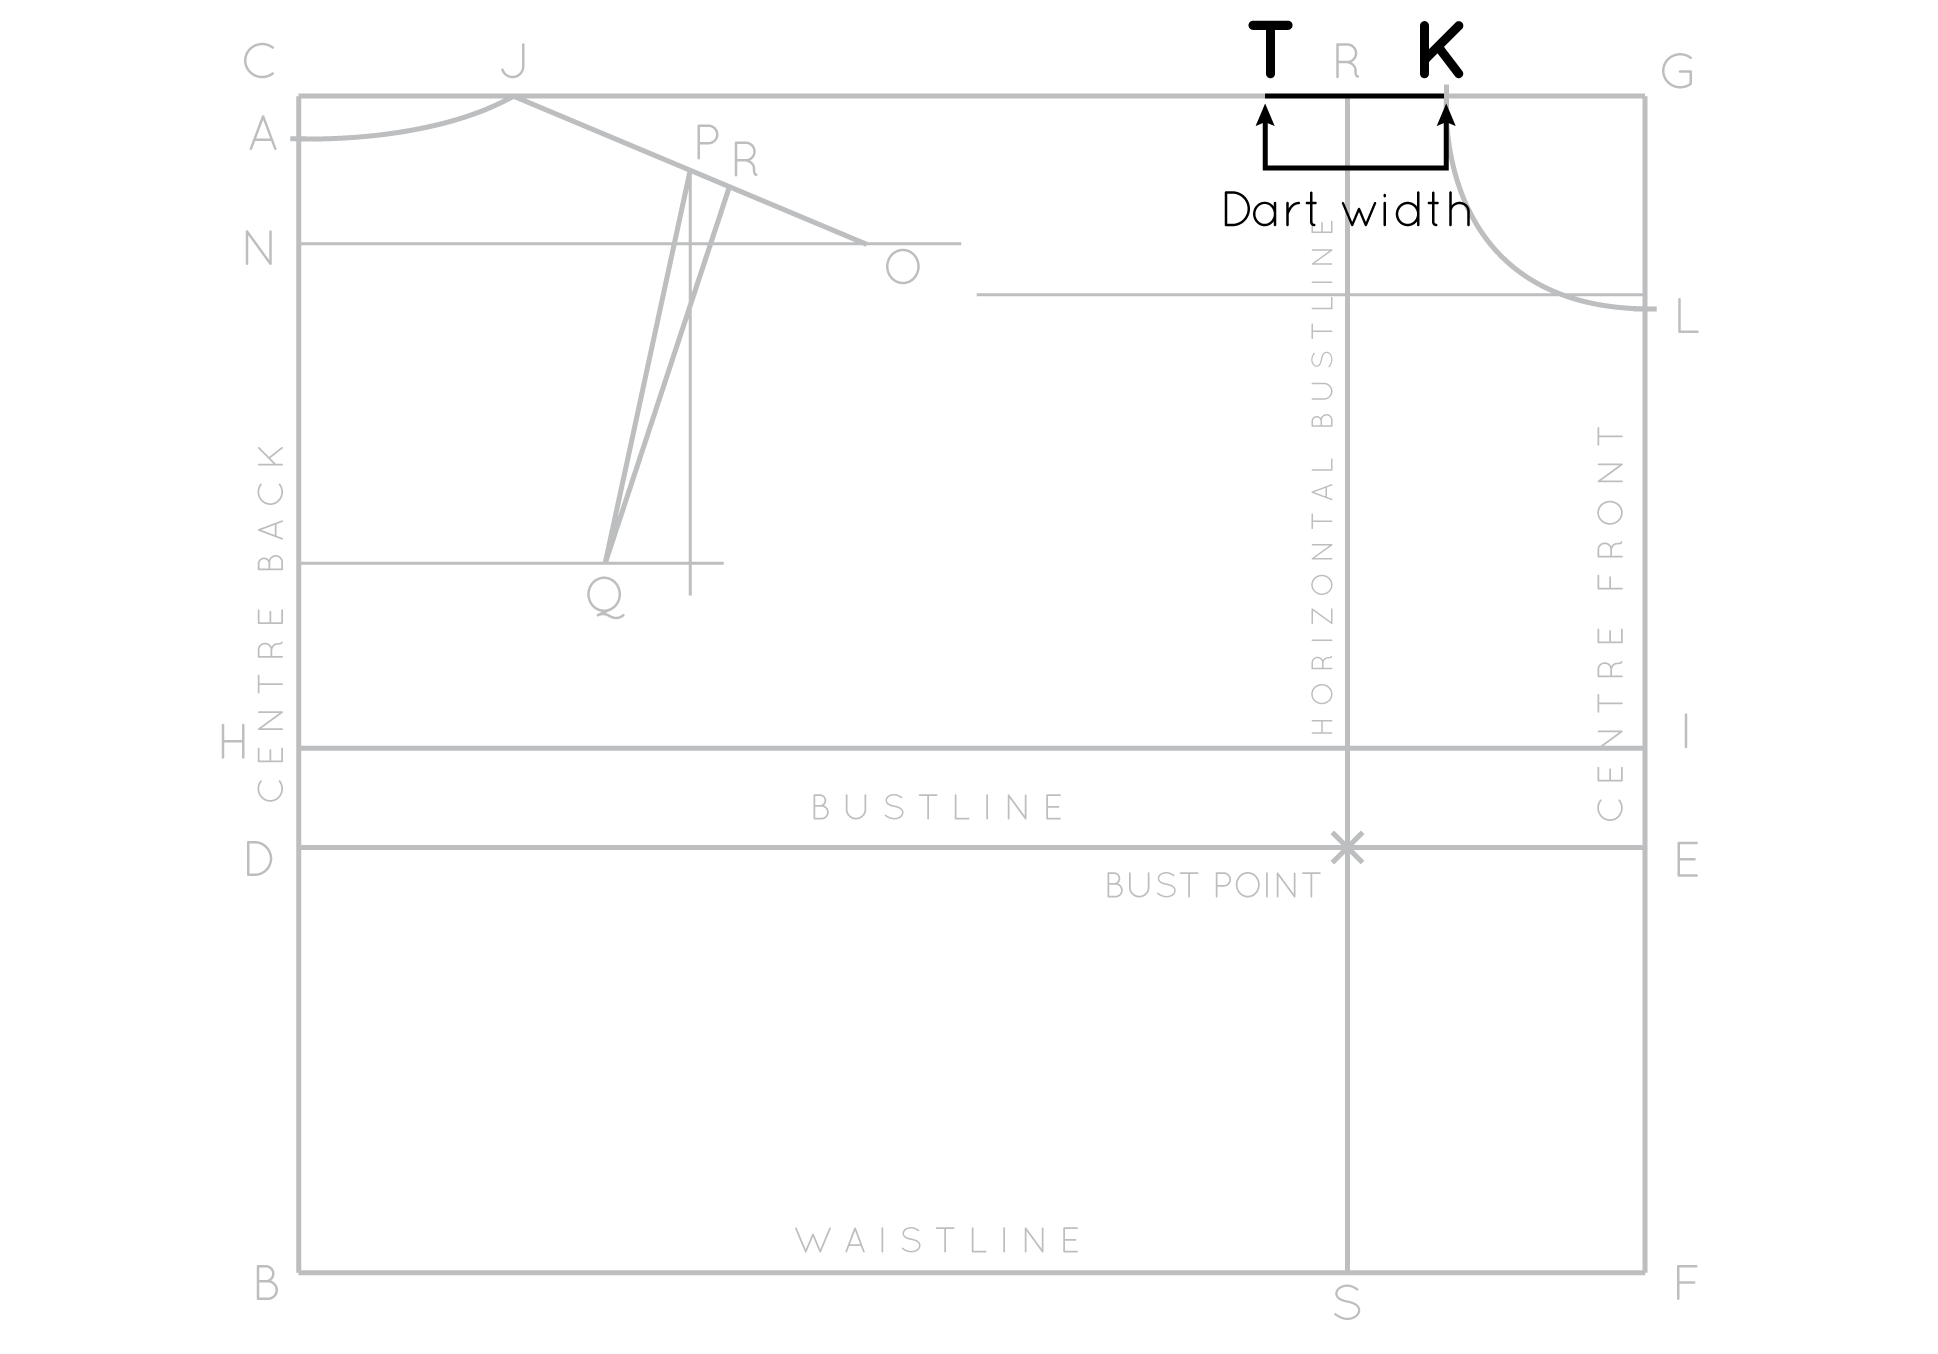
This is 1 of the equations taken from the BurdaStyle tutorial that is very handy (I am not sure if I would have been able to piece of work this out without this guidance!)
Add or subtract 0.six cm (one/4") to 7cm (two iii/4") for each 4cm (1 1/ii") bust increment in a higher place or below 88cm (34 1/2"). For bigger busts yous will demand a larger sprint (add to 7cm), and for a smaller bosom you will demand a small dart (therefore decrease from 7cm).
For example, my bust measurement is 84cm (33"), which is 4cm (1 1/ii") below 88cm (34 1/2"), therefore I demand to subtract 0.6cm (i/4") from 7cm (2 3/4"), leaving a sprint width of 6.4cm (2 1/ii").
Take sprint width measurement and marking this distance from K as point T.
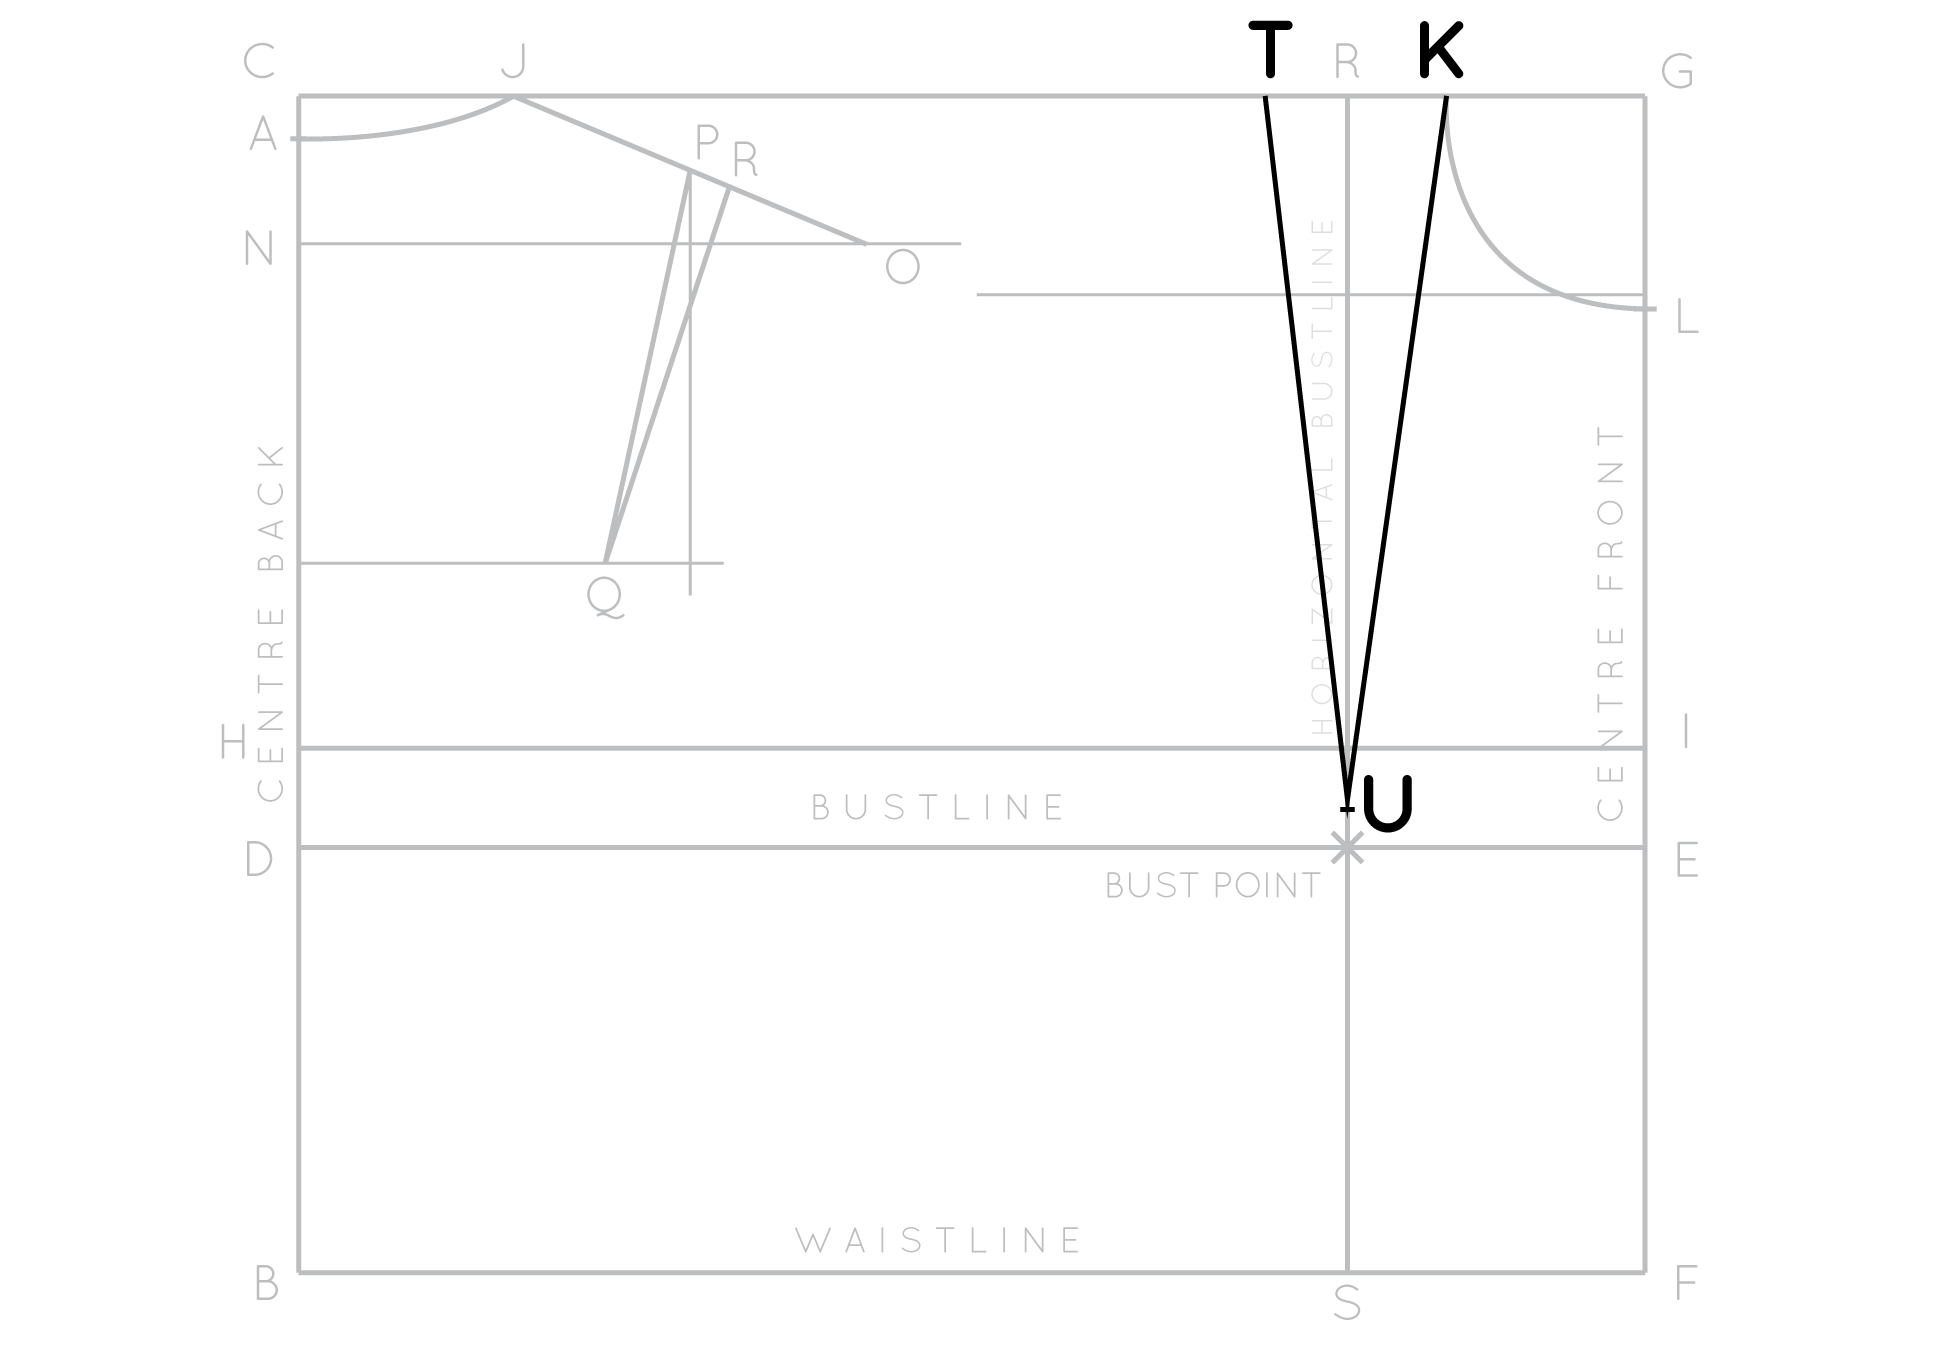
Move down to the BUST Bespeak and mark a point 1cm (iii/8") to a higher place it on line RS (vertical bust line) as point U. This will be the point of your dart. The reason why we lift the sprint indicate a little in a higher place the bust point is that if the sprint bespeak was right at bust point you would be left with Madonna mode pointed breasts!
Join G and T to U with straight lines to create the front shoulder dart.
Drafting front shoulder seam
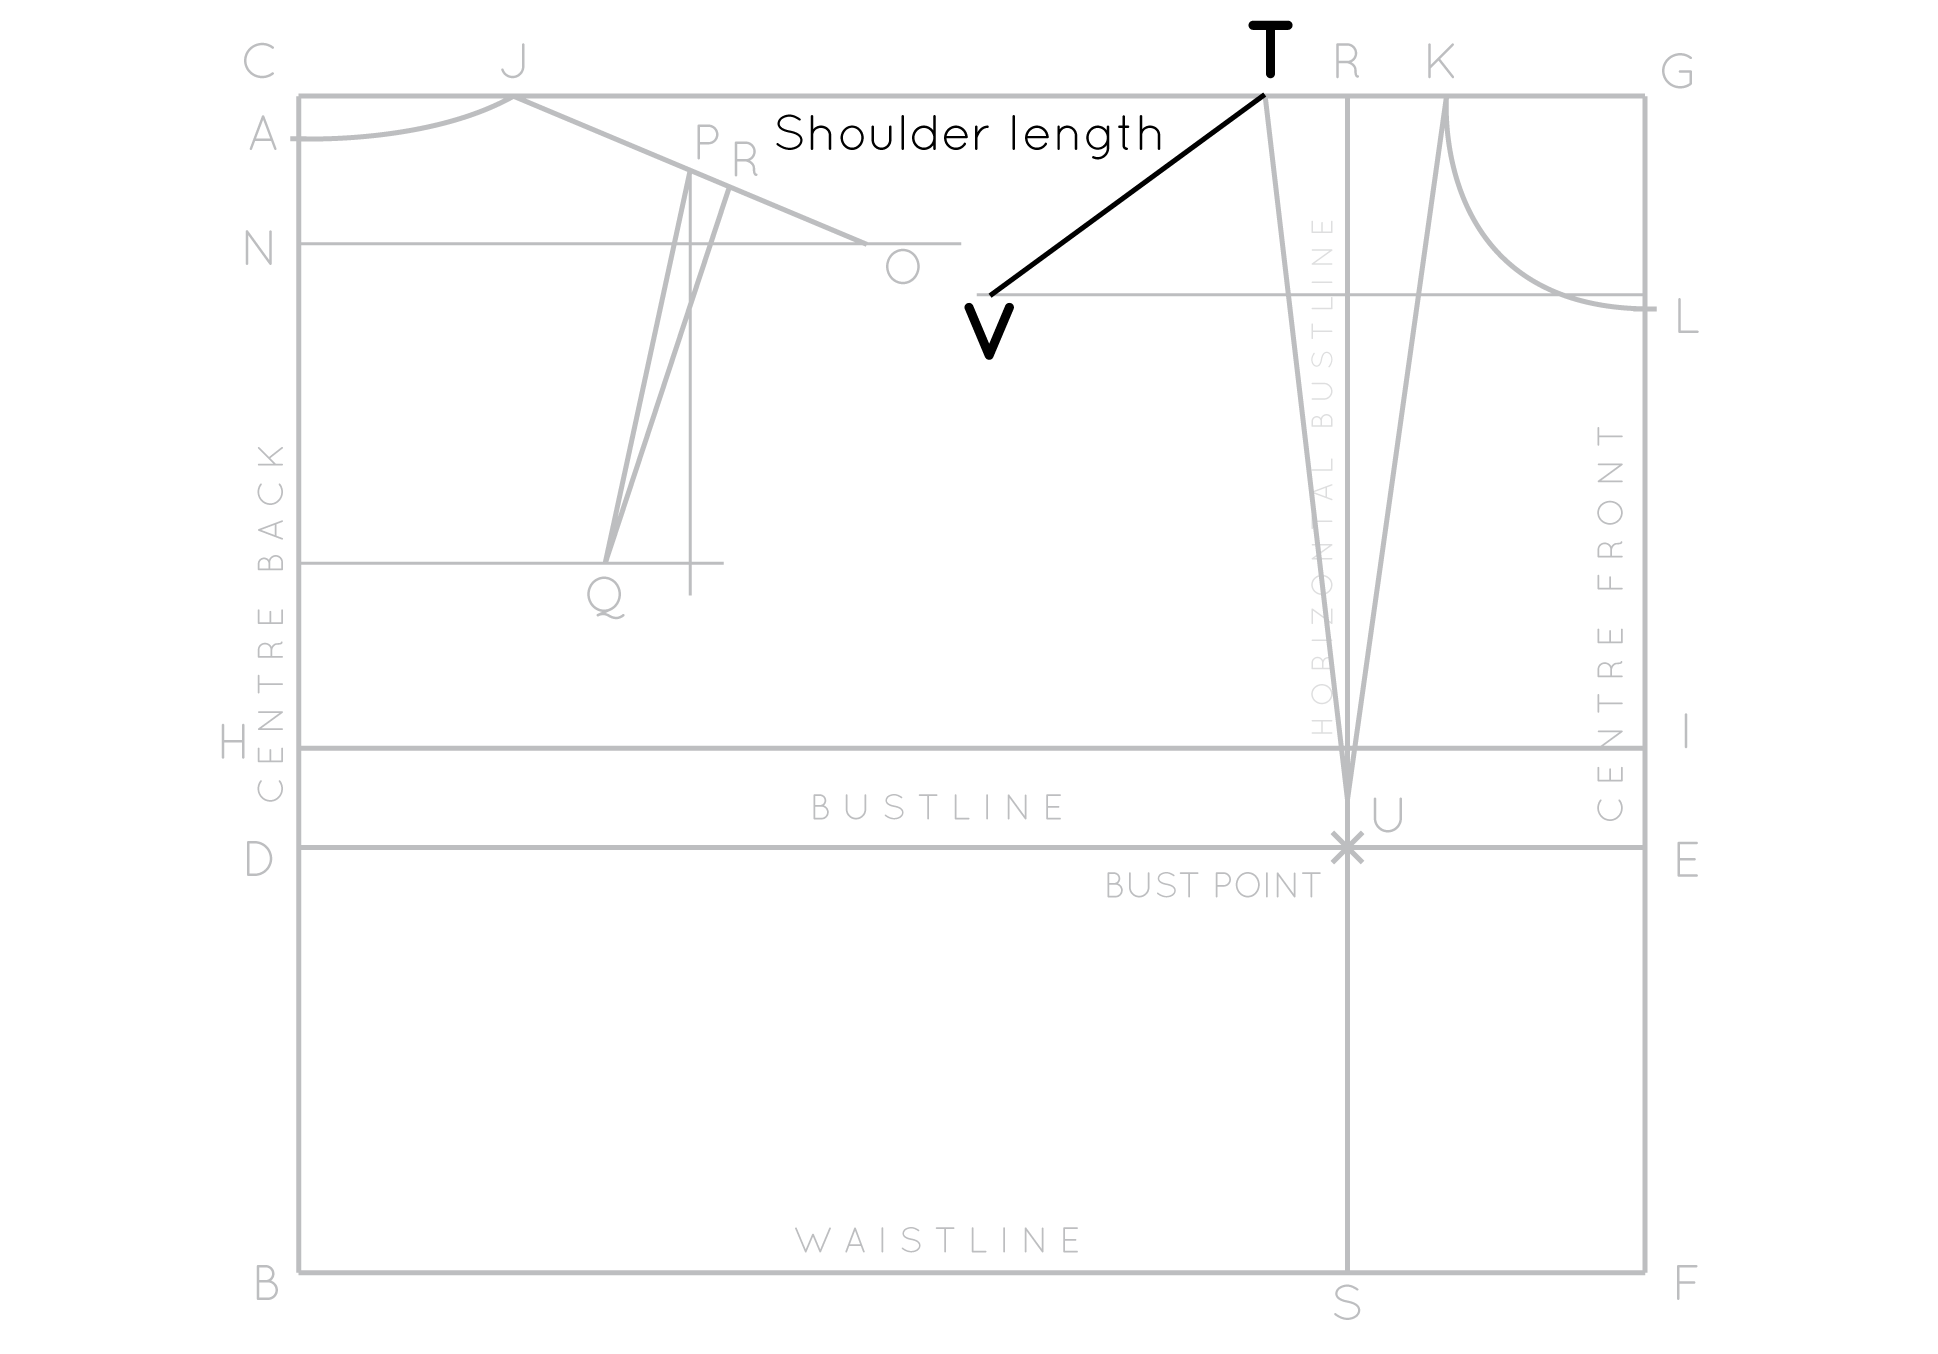
Accept your shoulder length measurement and, with this length in mind, and using your ruler, pin from point T until your measurement passes through the perpendicular line fatigued from higher up betoken Fifty. Draw a directly line - creating your front shoulder line. Marker the endpoint as betoken Five.
Please note: information technology's not a trouble if your shoulder lines overlap - merely go along working through the tutorial. When you get to the terminate you will exist tracing a copy then that you have separate front and dorsum bodice pieces and can add seam assart.
Drafting the armhole
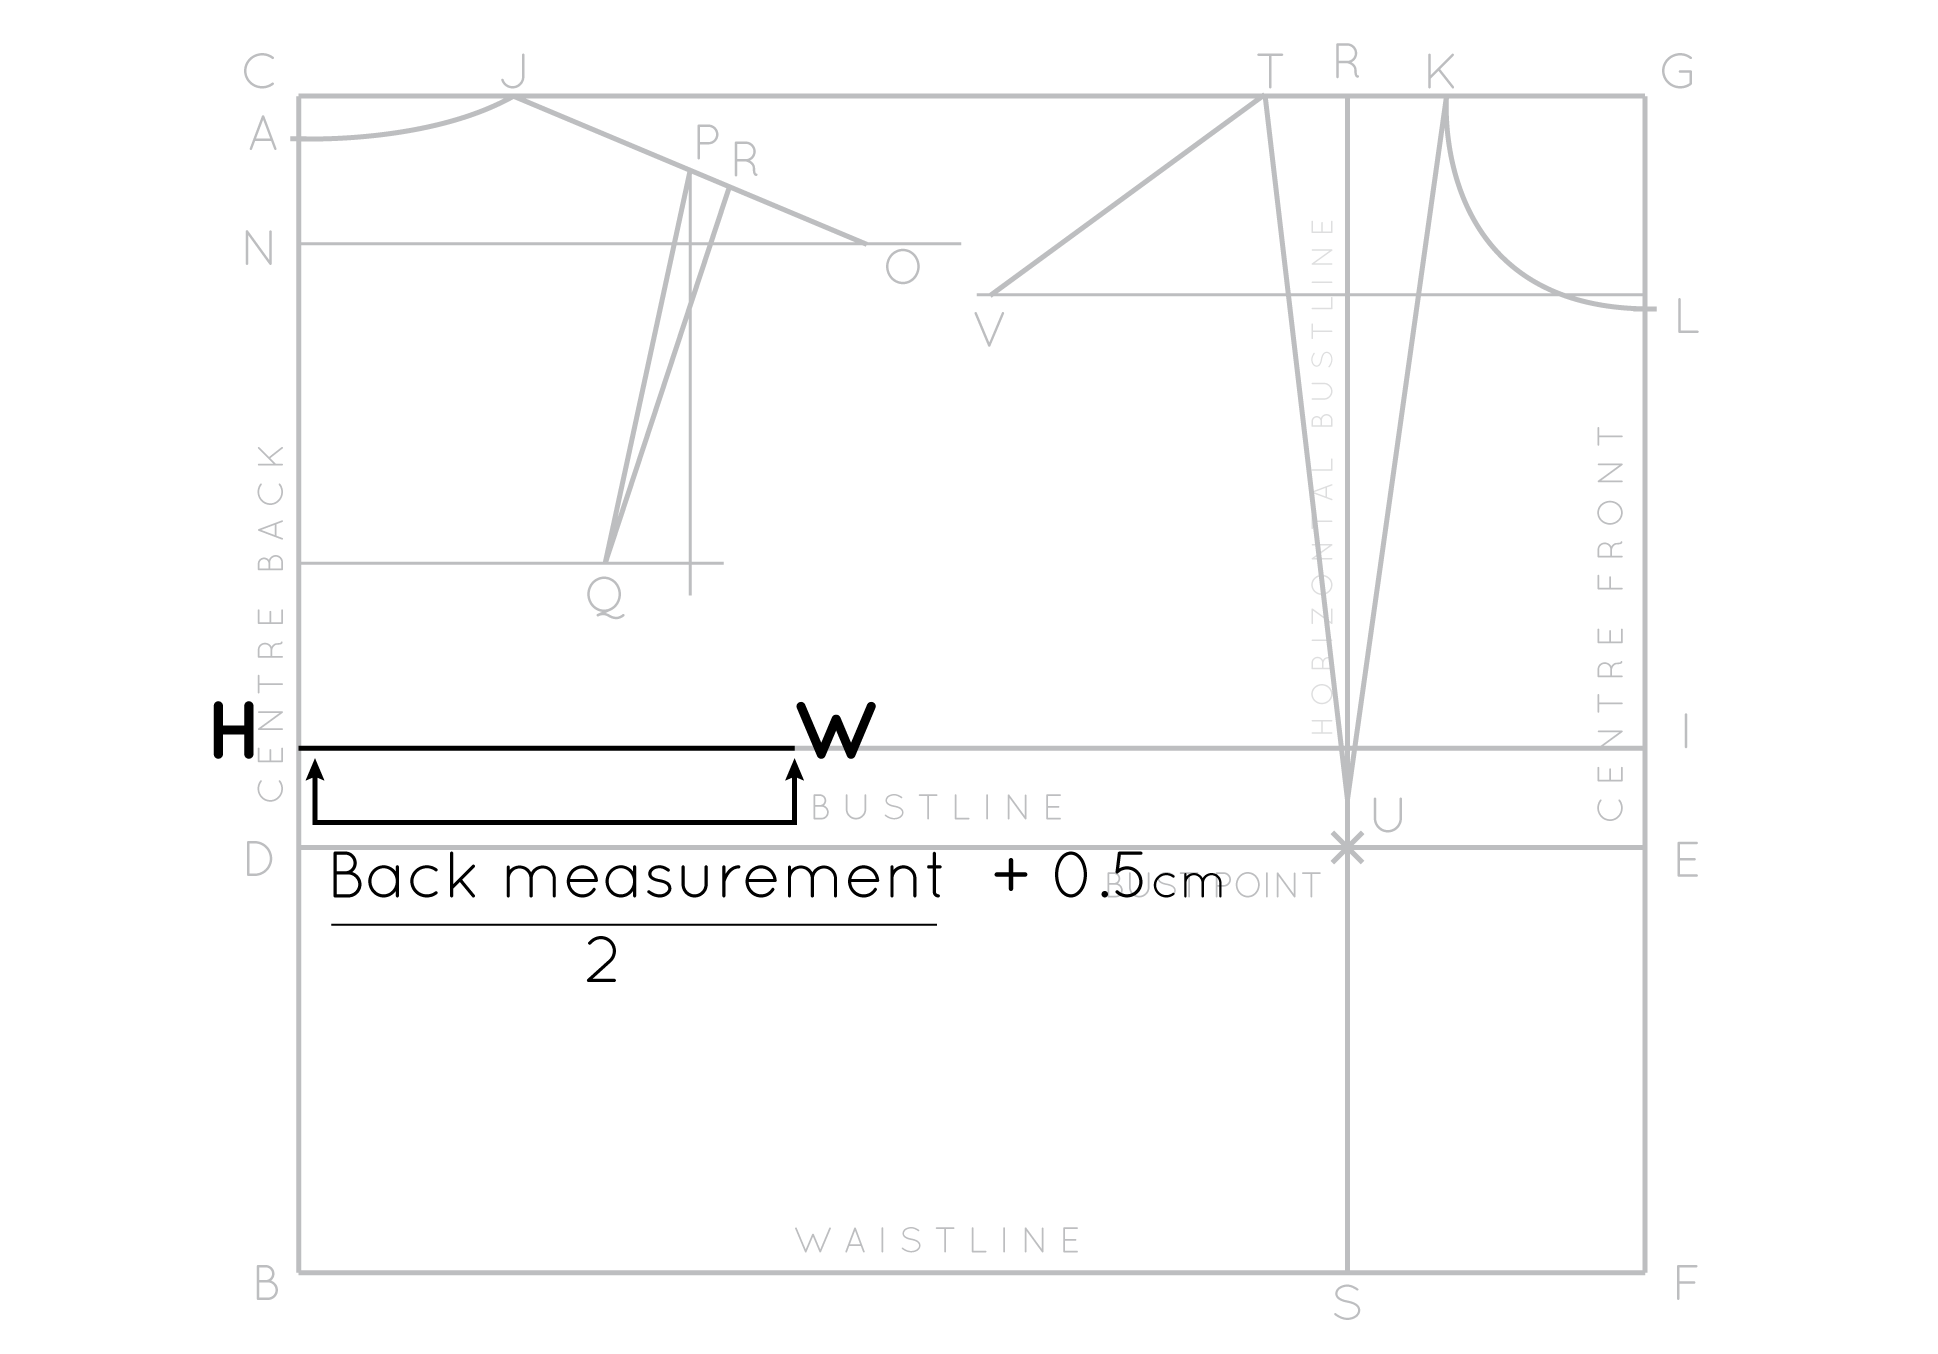
On line Hello mark a signal that is the length of half of your back measurement plus 0.5cm (one/4") (allocated ease), from H. Characterization betoken equally W.
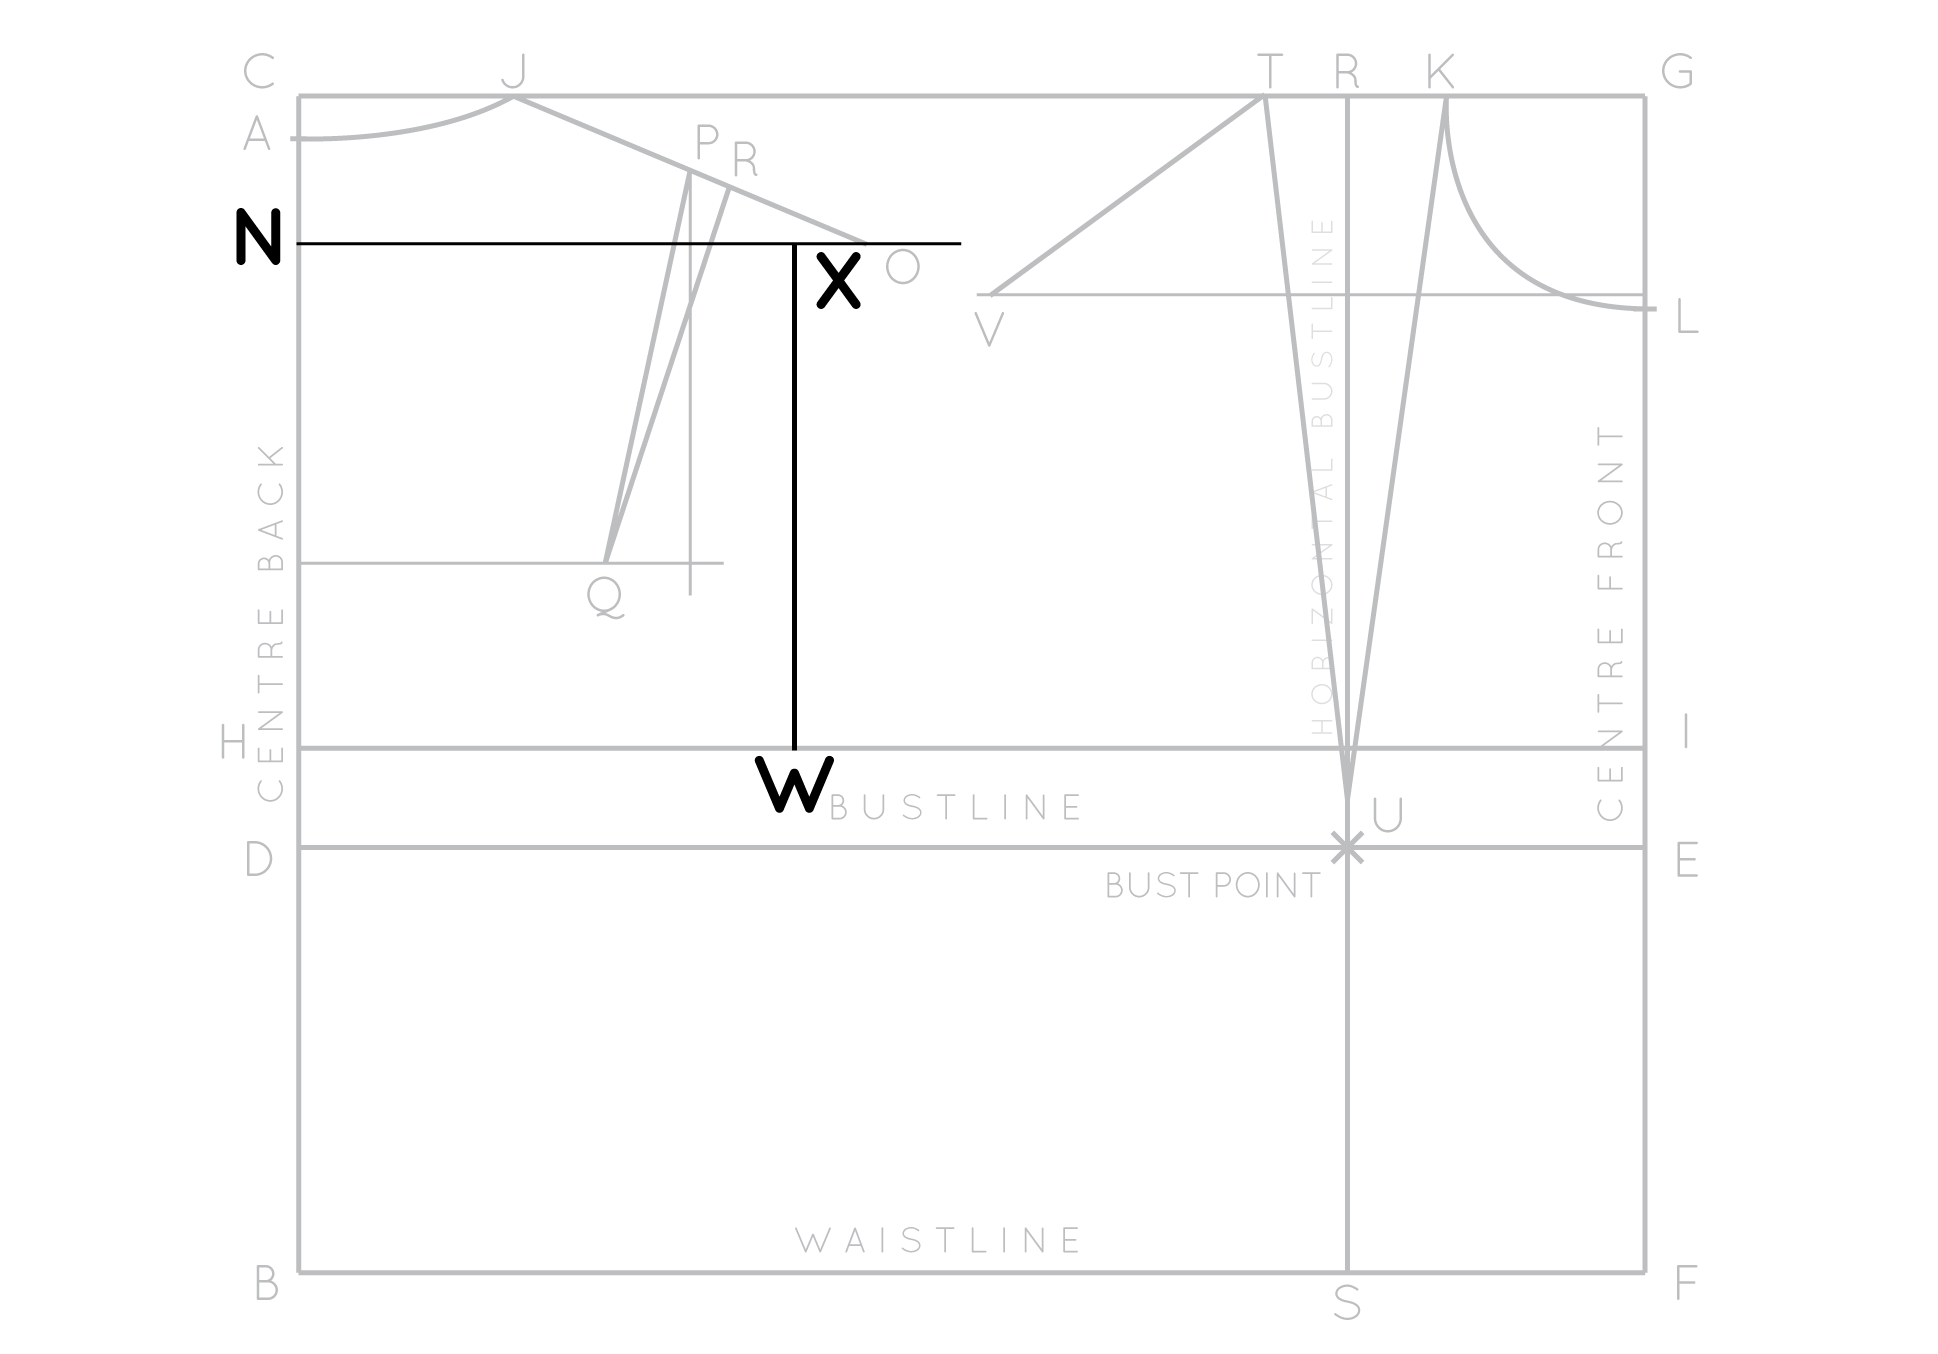
Square up from betoken W until the line intersects the perpendicular line fatigued from N. Mark the intersection betoken as 10.

Observe the midpoint of line XW. Marking as point Z.

Take the distance from the Heart Forepart to BUST POINT (i.east length from East to BP or half bust apex to apexmeasurement plus 0.5cm) and mark this distance on line HI, measuring from the dart arm closest to Eye back. Mark point every bit A1.
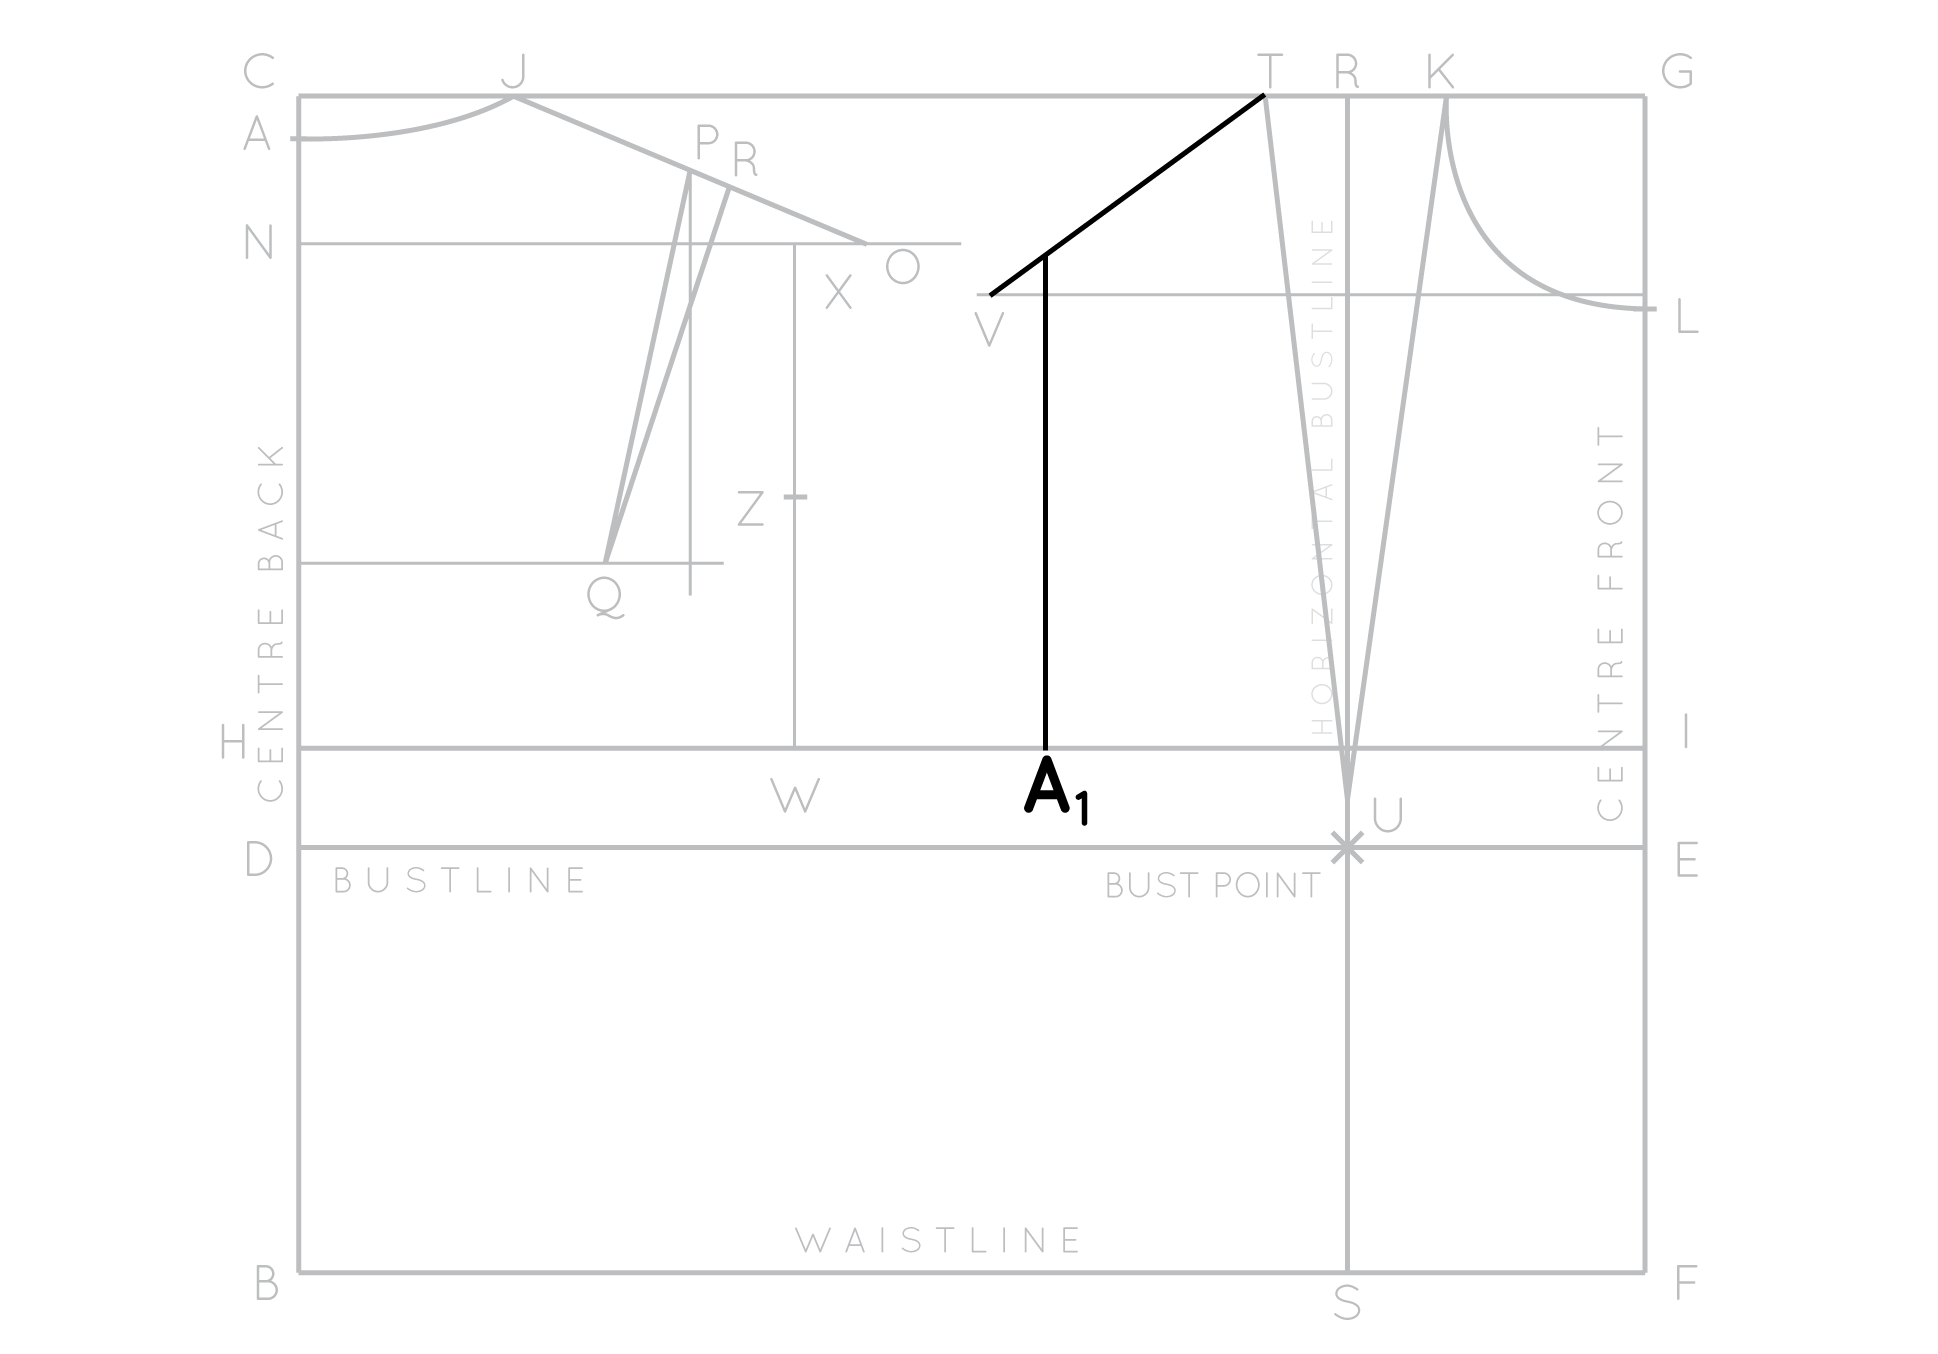
Square upwards from bespeak A1 then that the line intersects the front shoulder seam (line VT).

Take the armscye depth measurement and carve up information technology past five. Mark this length on the line just drawn from A1, every bit bespeak A2.

Detect the midpoint of the line between W and A1 and mark as A3. Square down from this indicate so that the line intersects waistline (line BF). Mark intersection point every bit A4.
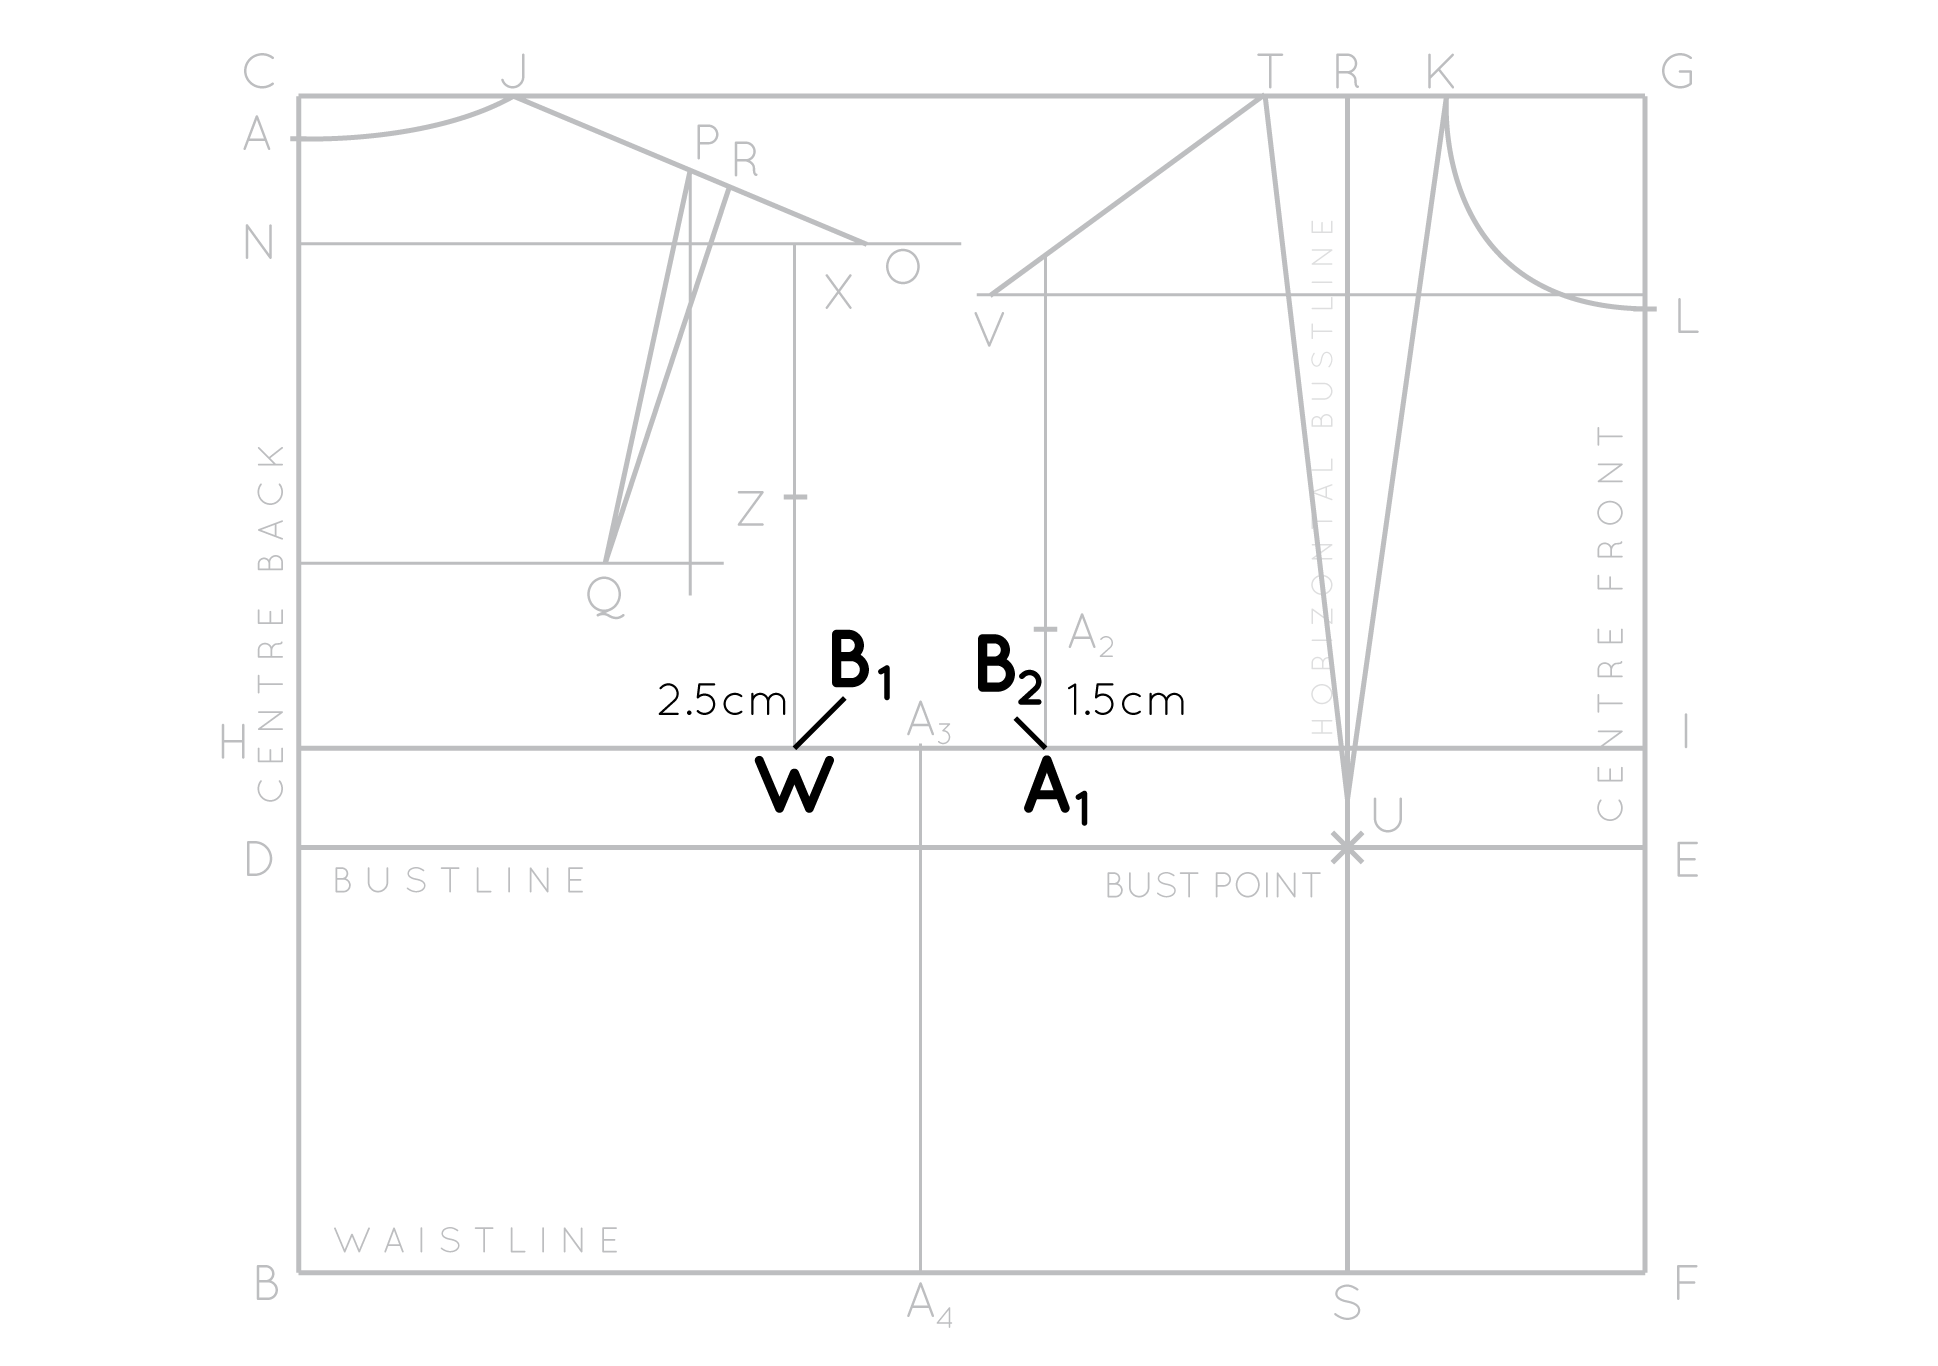
Draw diagonal lines (lines drawn at a 45 caste angle) inwards from points W and A1. From Due west the line needs to be 2.5cm long (1") (marker endpoint every bit B1), and from A1 1.5cm long (1/2") (marker endpoint equally B2). These diagonal lines volition assist in the next step, when we are at the phase of drawing in the curve of the armhole.

Join O to Z to B1 to A3 to B2 to A2 to T with straight lines.
creating darts
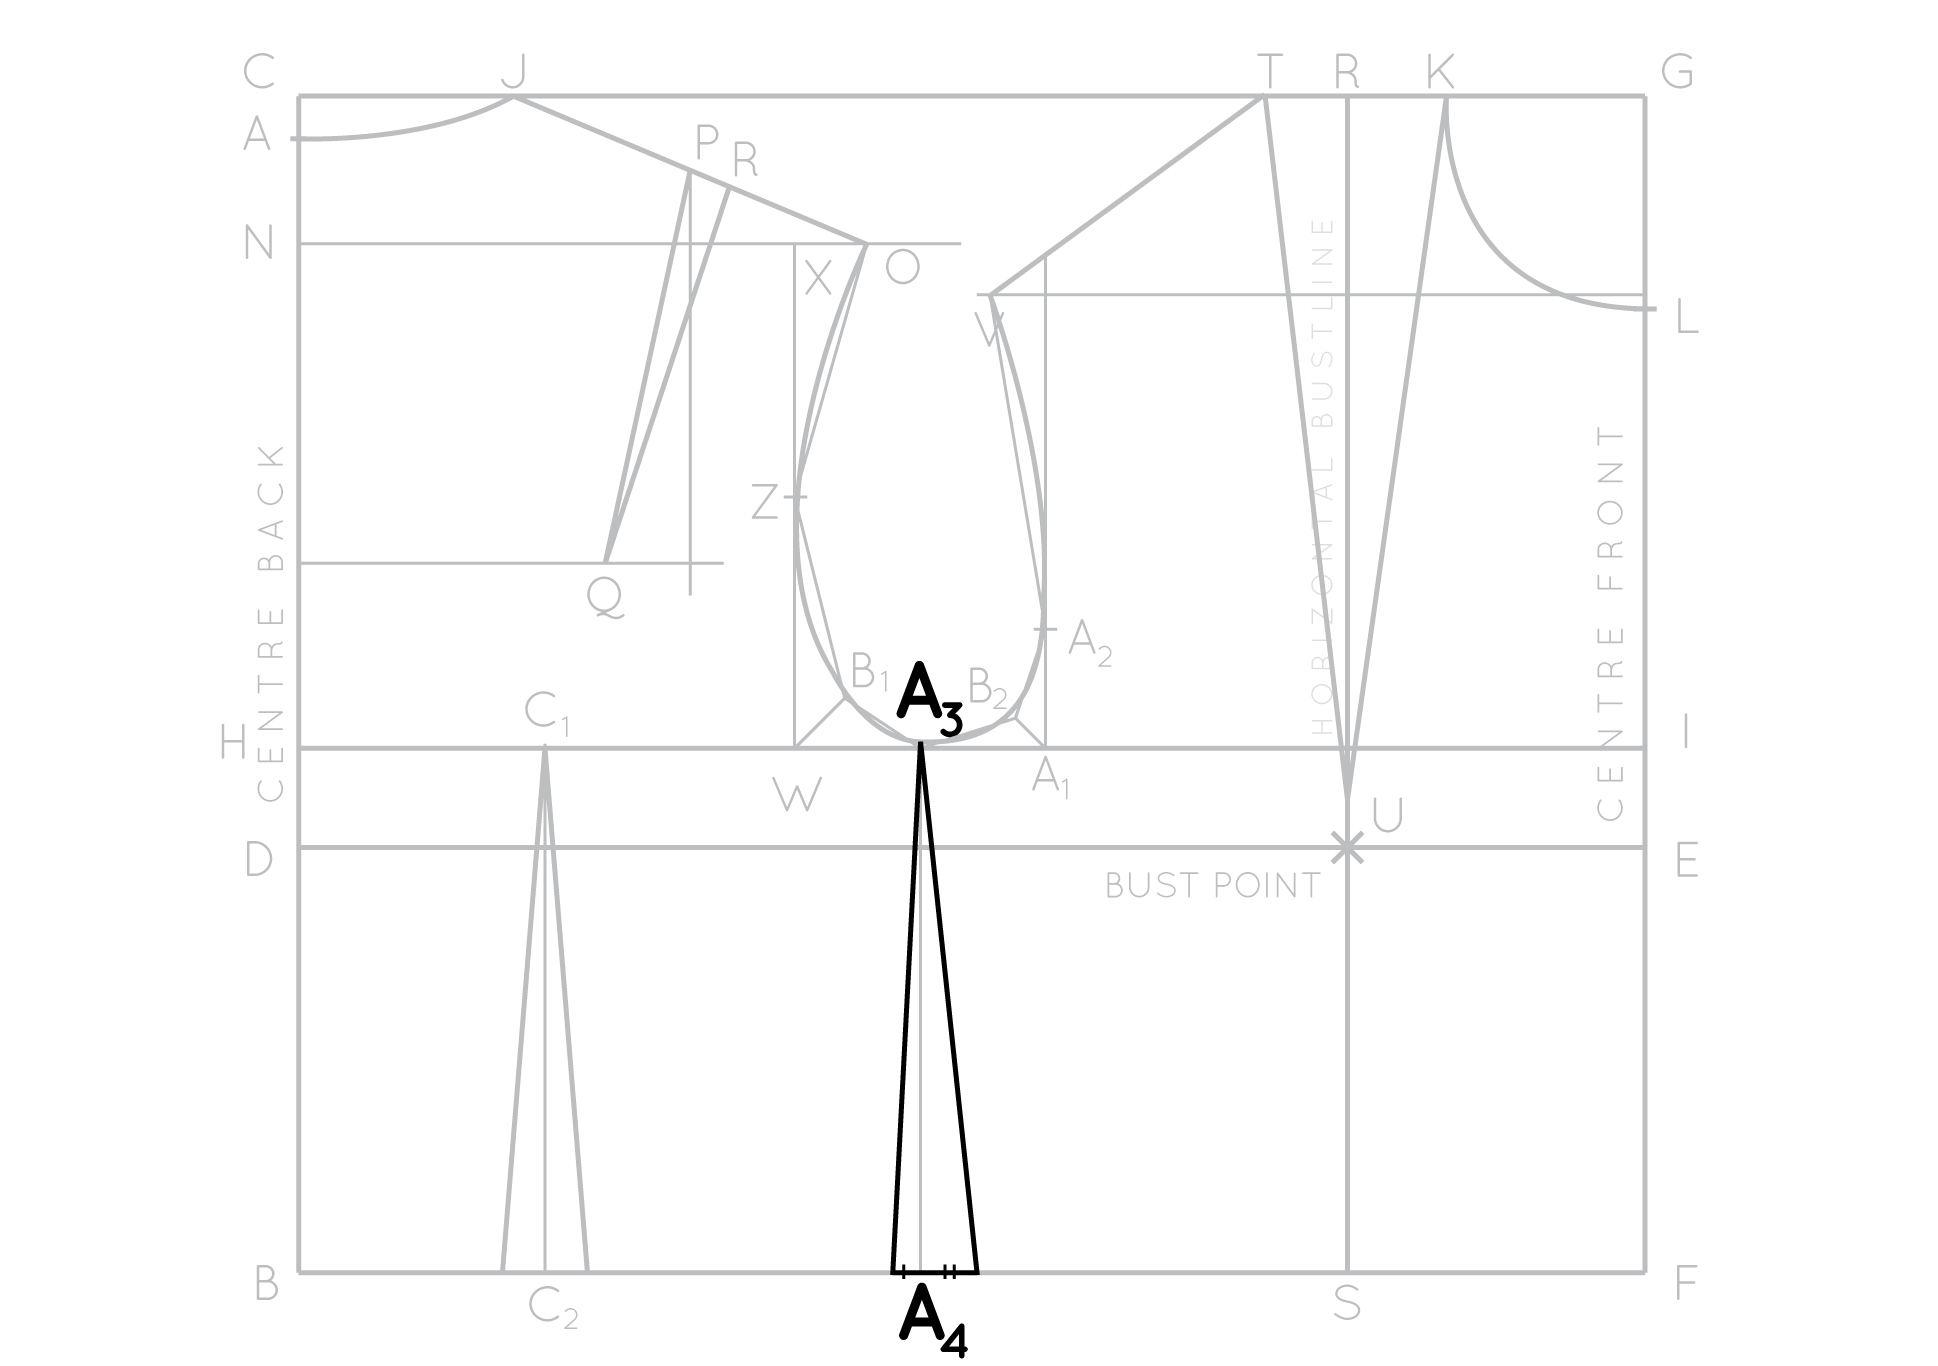
At this betoken, the waist measurement is the same as the bust measurement. For a lot of usa, our bust measurement is larger than our waist measurement. To remove this excess width from the waist and to create a well plumbing fixtures block you will add waist darts (1 in the back waist and one in the forepart waist – remember this is on the one-half so when you lot make your block in that location volition be 2 in the back, and two in the front. Nosotros will also slightly taper the side seam, which we will also treat as a dart at this stage).
To work out how much width yous volition demand to remove with your darts, take your waist measurement and add 2cm (7/viii") ease. Decrease this measurement from your bust measurement and divide your answer by two.
Dissever this number by three, then that it tin be distributed evenly throughout back dart, front dart and side seam.
Draft THE BACK WAIST DART

To mark the placement of the dorsum waist sprint, detect the midpoint of line HV and label as C1. Square down from this point so that line intersects the WAIST LINE (BF). Marking the point of intersection as betoken C2. This will become the heart of your back dart.

Distribute the dart width evenly either side of C2 and join endpoints to C1 to create dart arms.
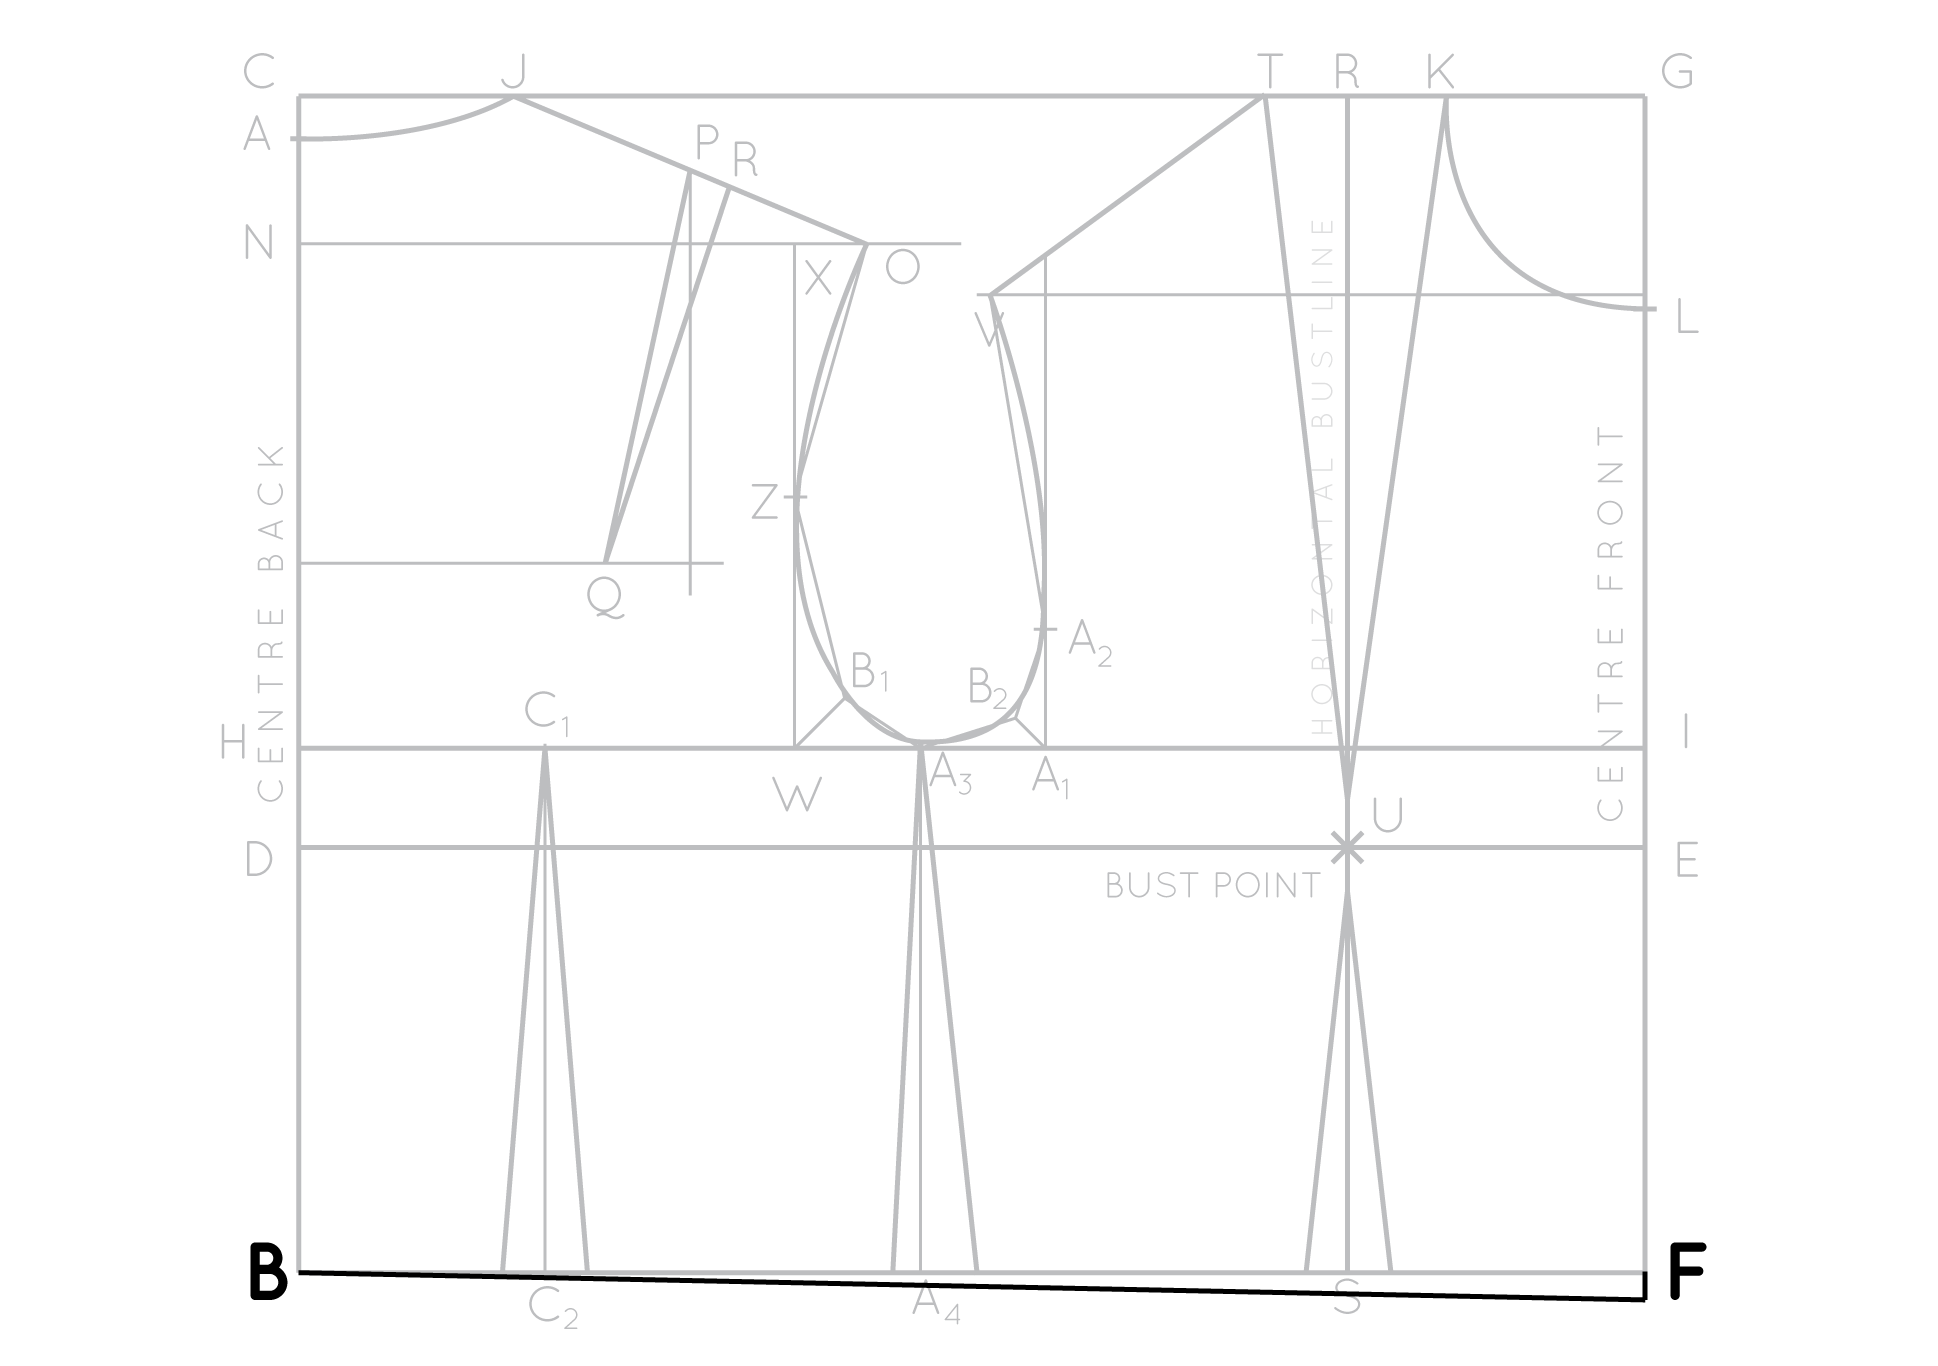
Draft the side seam
For simplicity, at this phase, treat the side seam (line A3-A4) as a dart at this signal. Distribute one 3rd of the dart width to the dorsum of the bodice and two-thirds to front of the bodice, either side of A2. Join the endpoints to A3 to create the front and back side seams.
Draft the front waist dart

Distribute dart width evenly either side of S and bring together the endpoints to a point 1cm (3/8") down from BP to create sprint arms.
Balance the waistline
At this point the waistline of the pattern is directly. But equally the front of our bodice must laissez passer over the fullest function of our chest (our bust), we need to add a little extra length to our CENTRE Front, to prevent this part of the waistline from riding up when the bodice is fabricated.
Mark a point 0.5cm (ane/four") to i.5cm (1/2") down from point F as point C1.
(0.5cm (1/4") for small-scale bust / 1cm (3/8") for medium bosom / 1.5cm (i/two") for large bosom)
Bring together point B to point C1.
Trace the pattern
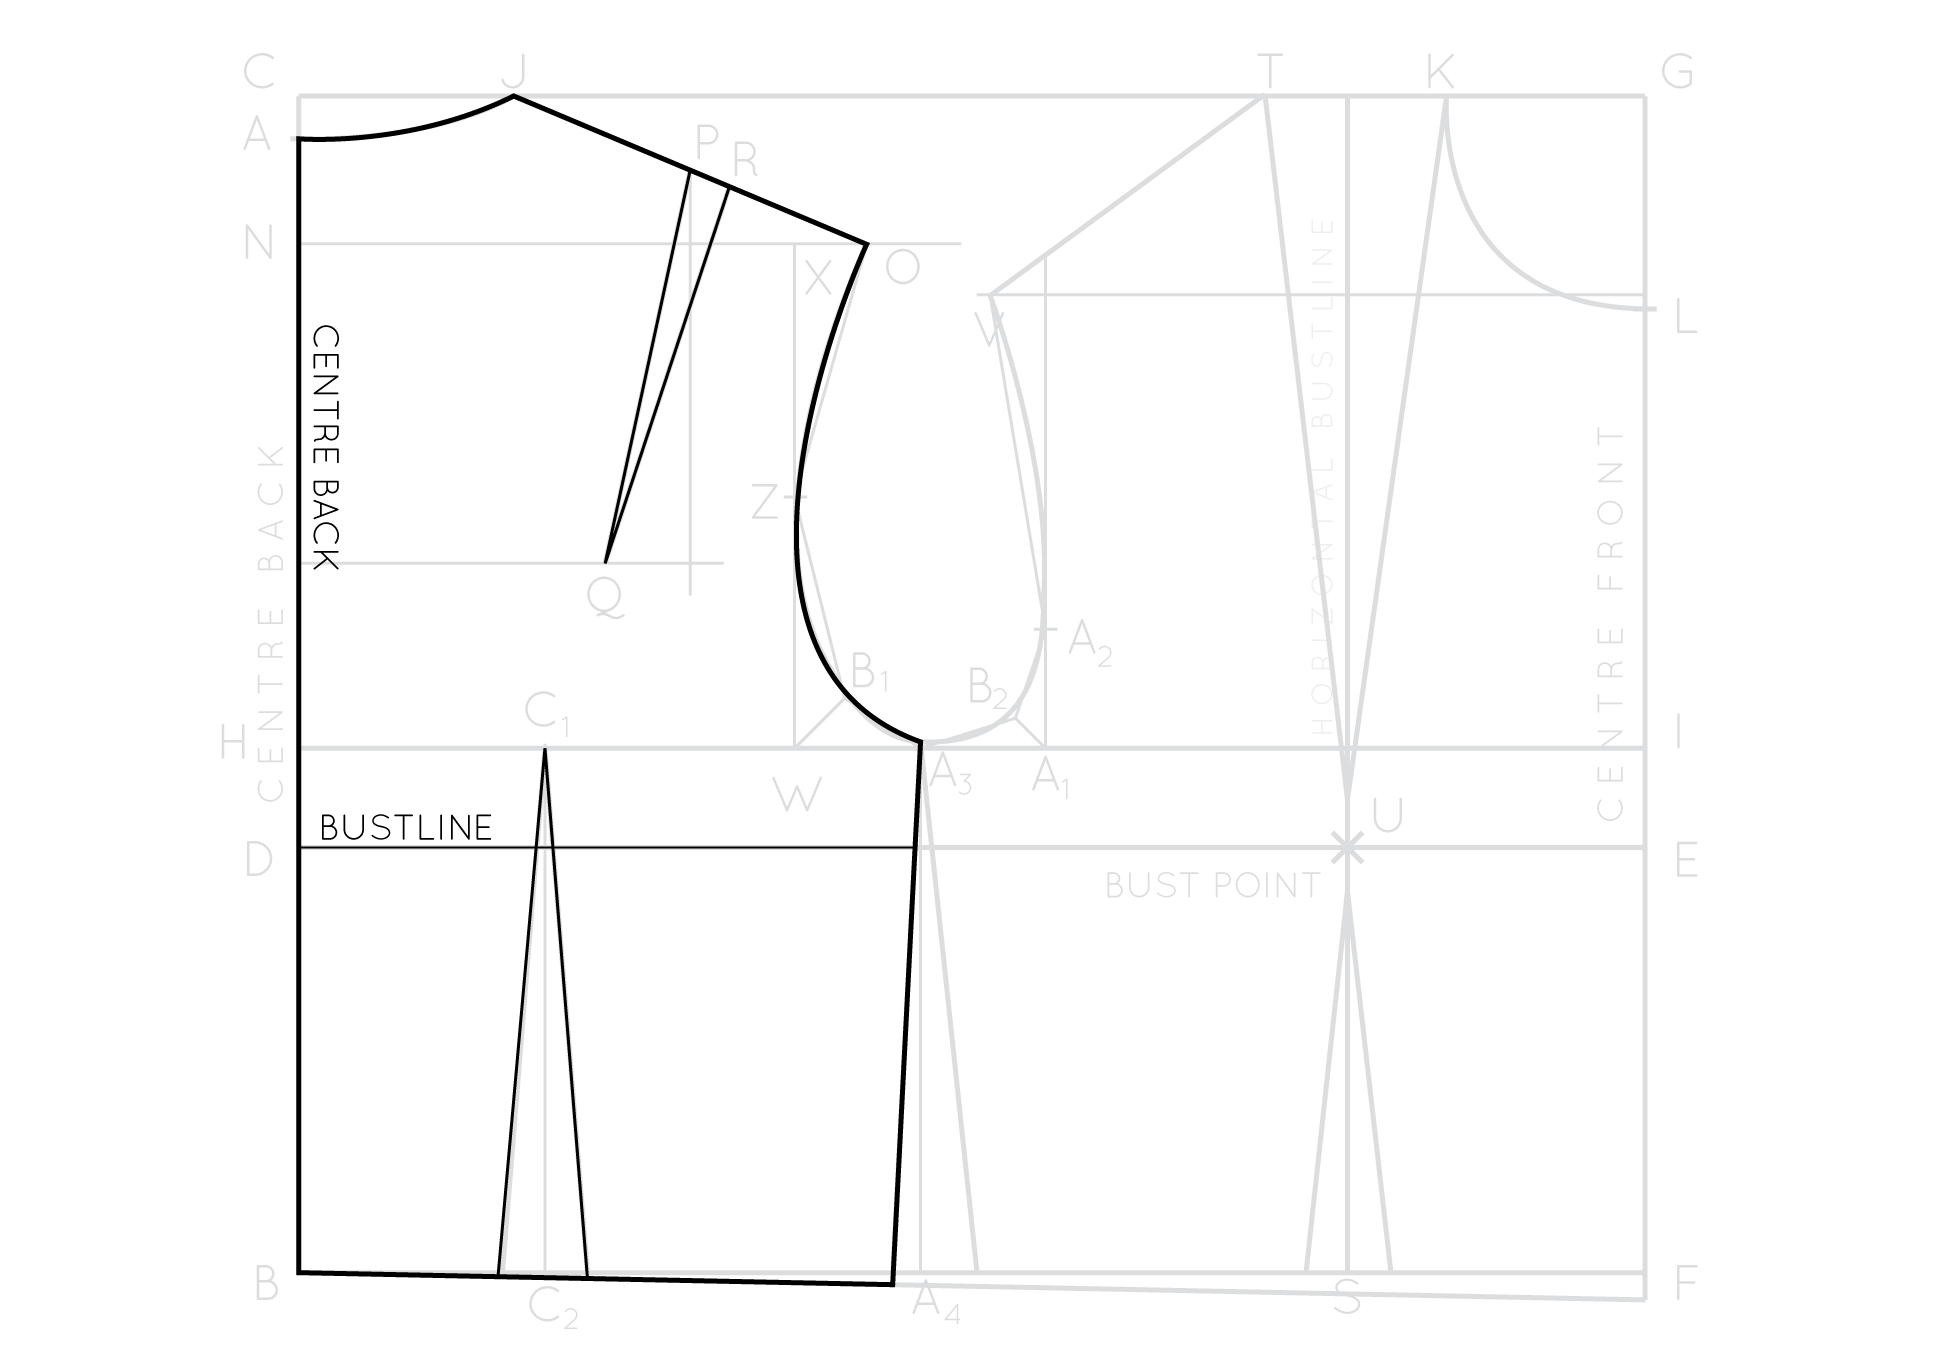
With a second slice of design paper, trace off the back pattern piece – being sure to include all important details (i.due east. bust line and darts).
Leaving a space between the pieces, trace the front pattern piece.
Add seam allowance to the blueprint

To terminate, add shaping to the darts (following this tutorial) and and then add seam allowance to the pattern. As it is a bodice block, I notice that it is handy to have it available without seam assart (every bit when you lot are making alterations or adjusting a blueprint information technology is far easier to practice so without seam allowance), merely equally you will need to brand a toile to see how it fits, add seam assart to the seams that will exist sewn - the side seams, eye back and shoulder seams. The other seams - the neckline, armholes and waistline - tin can be left without seam allowance and then that y'all tin can get a true indication of what information technology volition look like without having to finish these seams or add a facing etc. I went for one.5cm (one/two") seam allowance on the shoulders and side seams, and 2cm (7/8") on the eye back. For more details on calculation seam allowance, you tin have a look at this tutorial.
Add pattern markings and cutting instructions
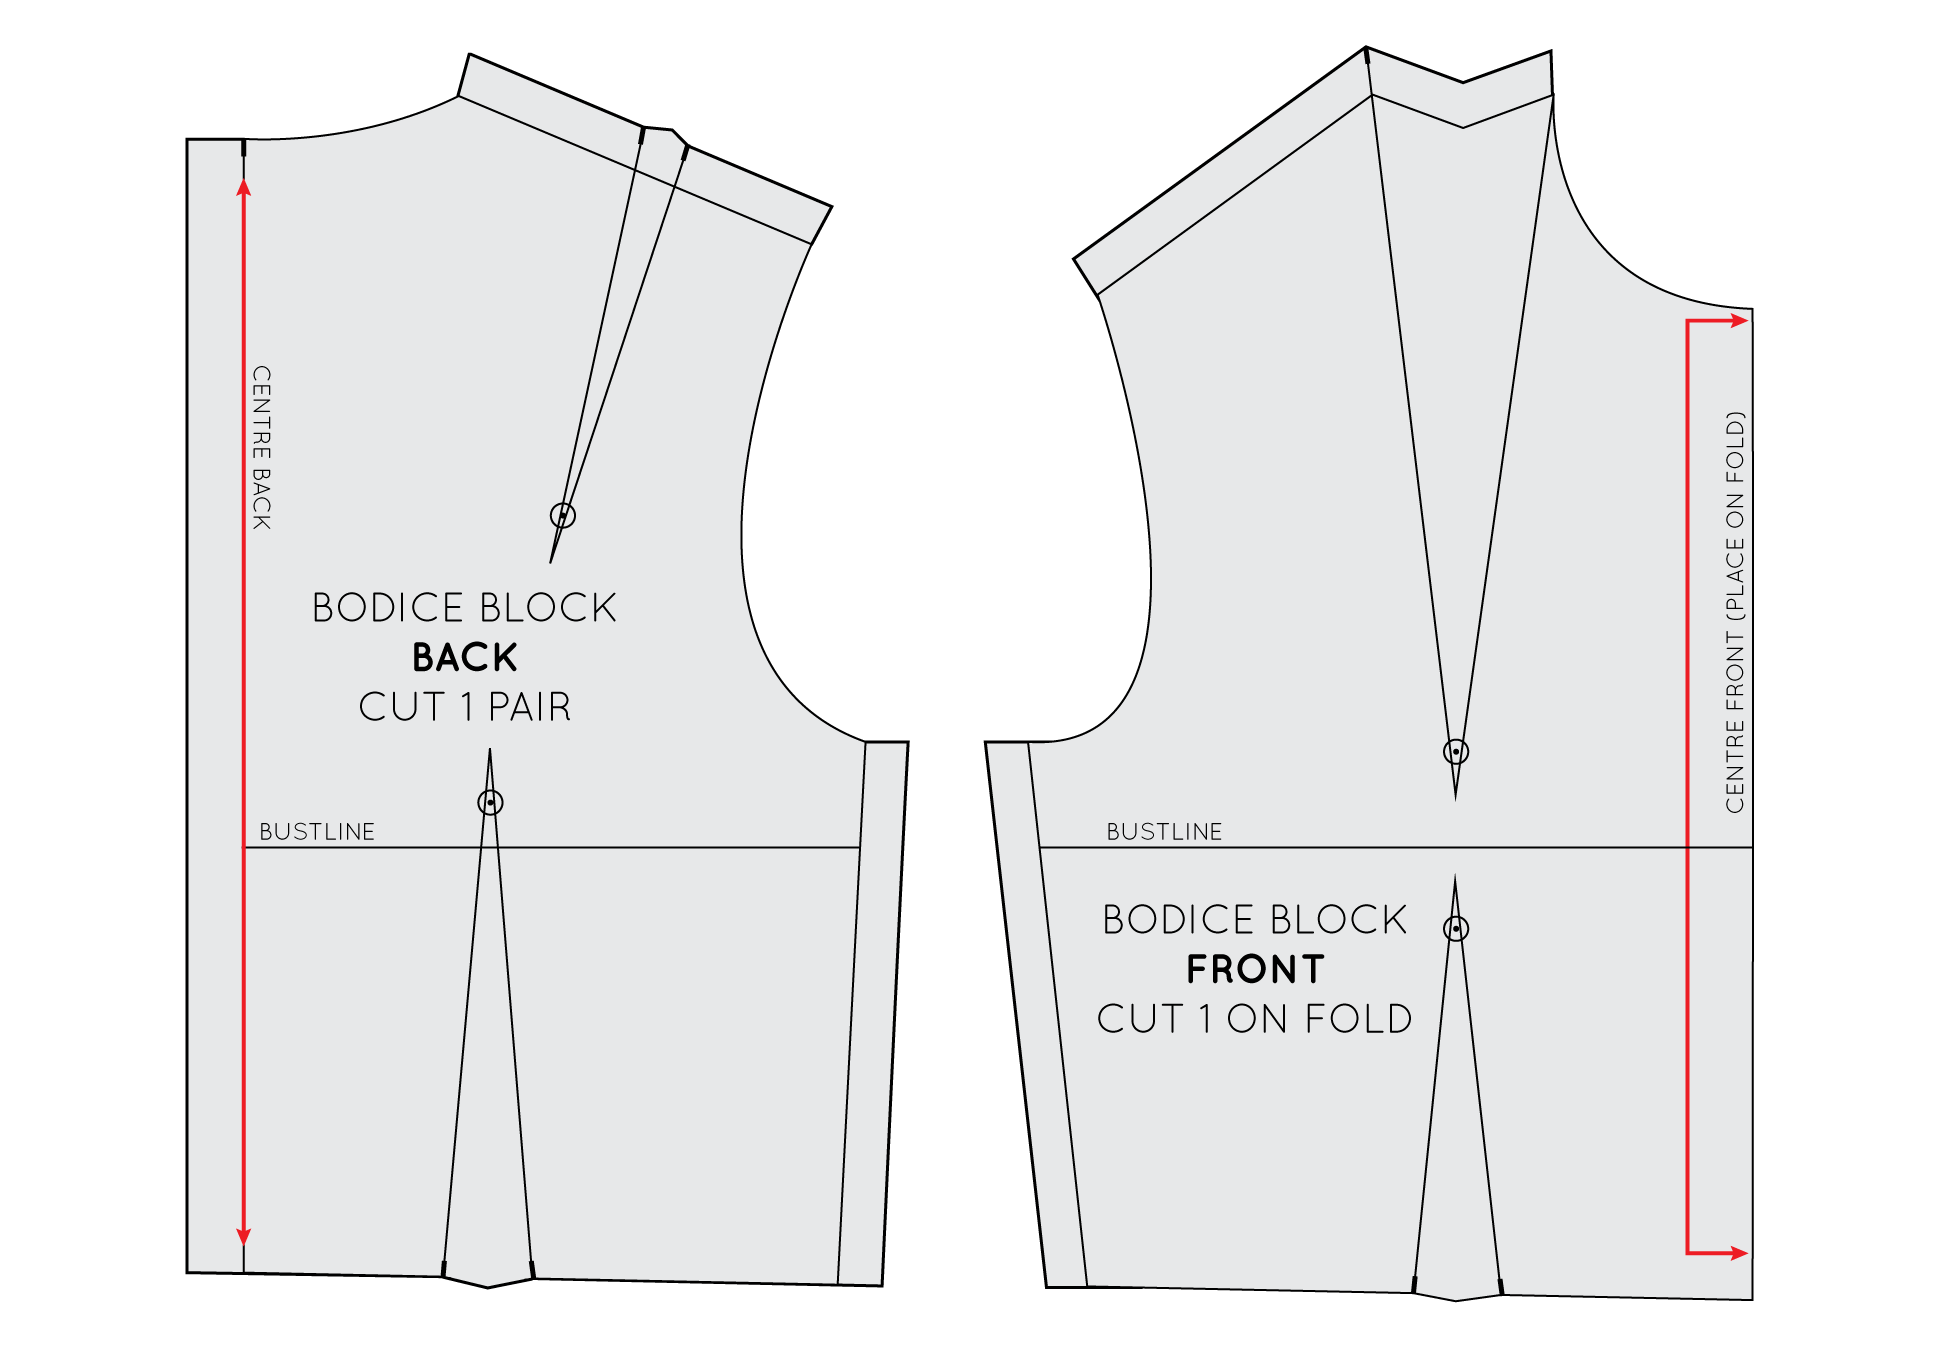
Add pattern markings to the pattern – being sure to marker drill holes (I ever marker my drill holes ane - 1.5cm (3/8" - one/2") above the dart point and notches.
And voila! There you have a basic bodice block to your very own measurements!
Sew it upward (in calico or something similar you may have hiding in your sewing box), meet how information technology fits and then y'all are set up to start getting creative making your own patterns!
Have a question nearly this tutorial?
Please bank check out these Frequently Asked Questions about the tutorial earlier getting in bear upon. I do dearest hearing from you, but y'all are probable to observe your reply faster than we are able to become back to yous.

Did you relish this tutorial?
It is our vision to empower yous to brand a wardrobe that you volition wearable, love and cherish - long into the future.
If this tutorial has helped you, it would be greatly appreciated if y'all could give thanks with a small donation. This volition assistance us to continue to create content like this tutorial and continue offering it for costless - and so it can be accessed by all.
Nosotros greatly appreciate your support!
Y'all may also like:
Source: https://inthefolds.com/blog/2016/2/22/how-to-draft-a-bodice-block
0 Response to "How To Make A Bodice For A Dress"
Post a Comment